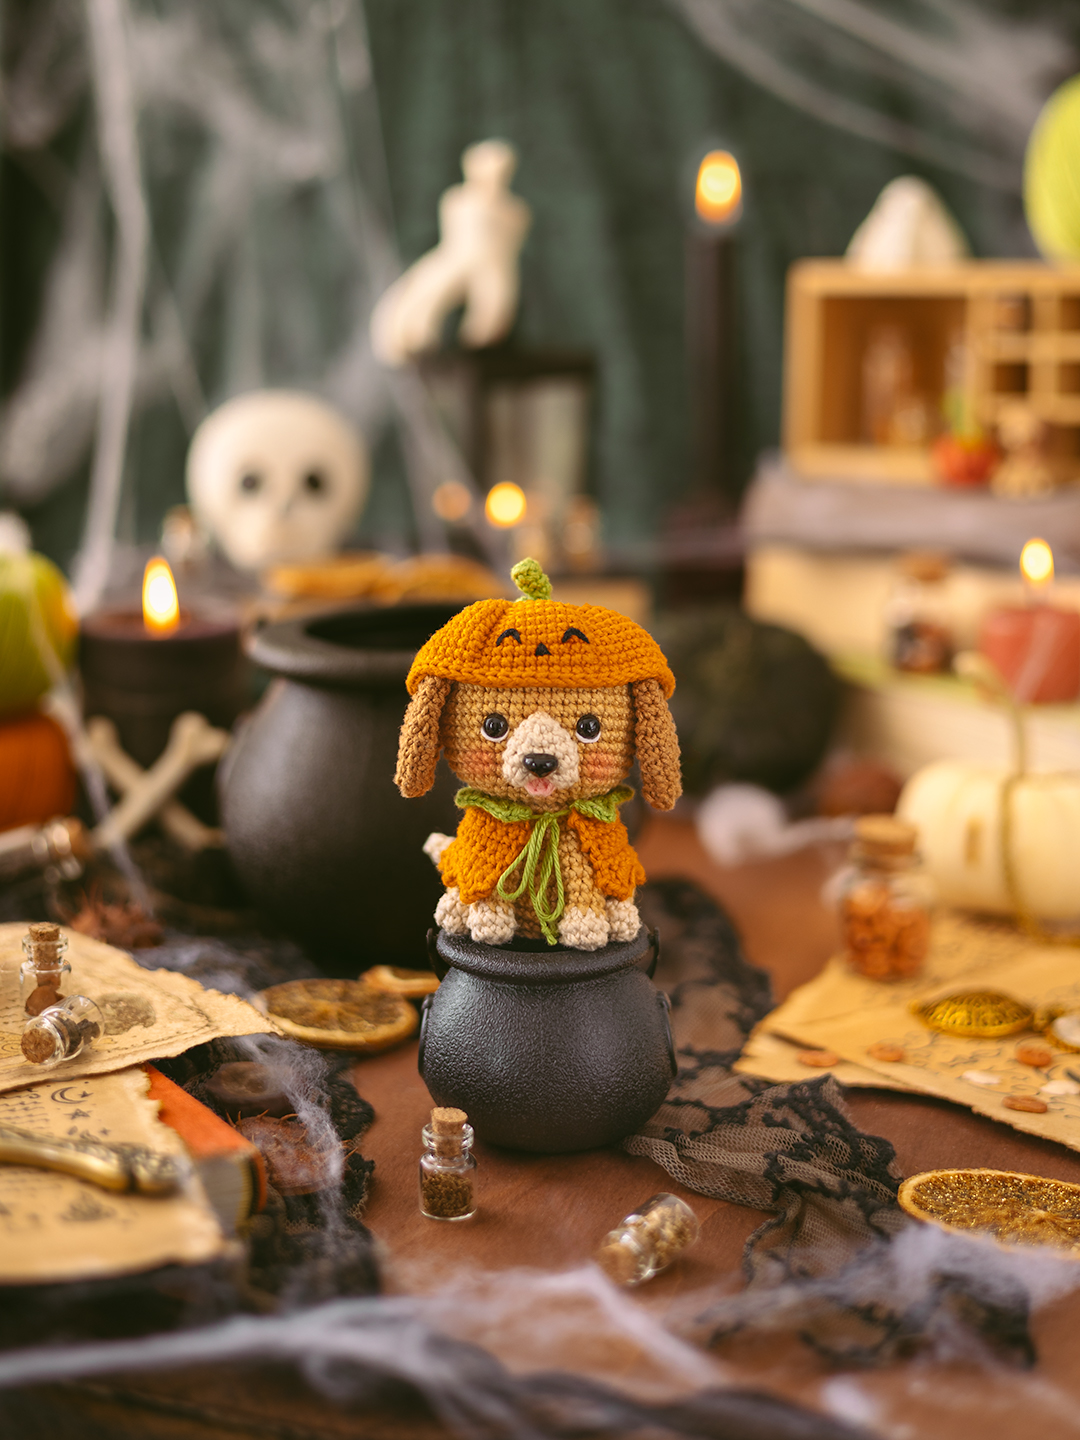
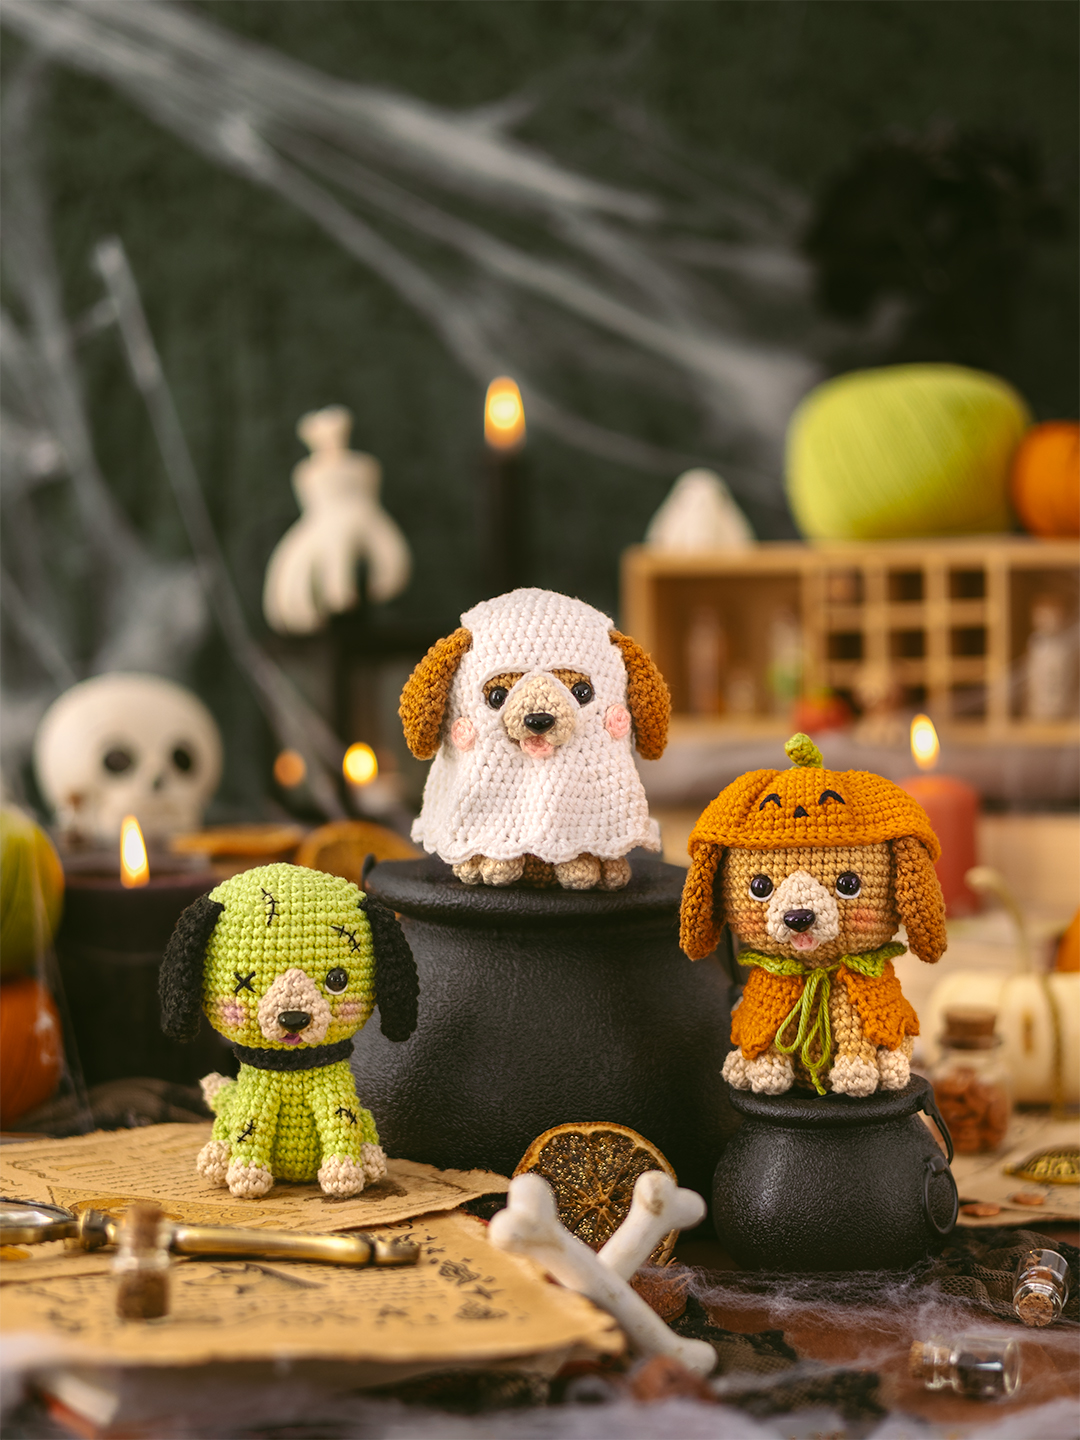
Pumpkin Dog
MATERIAIS
Círculo Amigurumi yarn in colors:
- Caramel #7076;
- Craft #7148;
- Porcelain #7564.
Círculo Amigurumi Slim yarn in colors:
- Dark Cheddar #4131;
- Off-white #8176 (leftover to embroider waterline of the eyes);
- Pistachio #5800;
- Breeze #3047.
- Embroidery thread Maxi Mouliné color Black #900 (for pumpkin hat details).
- 7 mm Black round safety eyes (2 units).
- 7 mm Black nose (1 unit).
- Embroidery needles (Tapestry no. 22 and Crewel no. 9).
- 2 mm Crochet hook.
- Fiberfill.
- Stitch markers.
- Sewing pins.
- Scissors.
- Silicone glue.
- Pliers.
- Blush or pastel chalk (for cheeks).
EXECUÇÃO
ABBREVIATIONS (US Terms)
- BLO: back loops only.
- Ch: chain stitch.
- Dc: double crochet.
- Dec: single crochet decrease (two sc closed together).
- Hdc: half double crochet.
- Hdc-inc: half double crochet increase (two hdc into the same stitch).
- Inc: single crochet increase (two sc into the same stitch).
- Picot: picot stitch crocheted with three ch (make three ch and then crochet a slst into the back bump of the third ch from the hook).
- Rnd: round(s).
- Sc: single crochet.
- Slst: slip stitch crochet.
- St: stitch(es).
- [...] x n: repeat the instructions, within brackets, n times.
- *…*: make all stitches, within asterisks, into the same base stitch.
- (...): total number of stitches in a round/row.
SIZE
- Using Círculo Amigurumi yarn, a 2 mm crochet hook, and X single crochet, the Pumpkin Dog will be approx. 10 cm tall.
SKILL LEVEL
- Intermediate-advanced.
CROCHETING INSTRUCTIONS
TONGUE
In color Breeze (Amigurumi Slim #3047).
Rnd. 1: make 1 sc, 1 hdc, 2 dc, 1 hdc, 1 sc in a magic ring (6).
Fasten off, leaving a tail for sewing.
Note: Tighten the magic ring as usual, but do not close the circle with an invisible fasten off. We will use the piece in the shape of a semicircle.
MUZZLE
In color Porcelain (Amigurumi #7564).
Note: Due to the small size of the piece, you’ll need a bit more patience when working on the decreases!
The heart-shaped muzzle will be worked in two parts.
PART 1
Rnd. 1: work 6 sc in a magic ring (6).
Fasten off the first part.
PART 2
Rnd. 1: work 6 sc in a magic ring (6).
Don't fasten off. On the next round, we'll join the two parts and begin crocheting the heart.
Rnd. 2: 3 sc, join Part 2 to Part 1 by working 1 sc into the first st of Part 1, complete the round making 1 sc, 1 inc, 3 sc on the Part 1. Continue on Part 2 with 2 sc, 1 inc (14).
Rnd. 3: 14 sc (14).
Rnd. 4: [1 dec, 2 sc, 1 dec, 1 sc] x 2 (10).
Rnd. 5: [1 dec, 1 sc] x 2, 2 dec (6).
Fasten off, leaving a long tail for sewing. The muzzle doesn’t need to be stuffed. Using a tapestry needle, weave the yarn tail through the front loop of each remaining stitch and pull tight to close the opening. Then, weave the remaining yarn through the heart, bringing it out at the side of the heart, where it will later be used for sewing.
ASSEMBLY
Glue the nose to the heart
Using with silicone glue, place the nose right in the center of the heart, over Rnds. 2 and 3, so that the tip of the muzzle sits between the two lobes of the heart.
Note: If you are using a safety nose with a post, the washer won’t fit due to the small size of the piece. In this case, cut off the post with pliers and then proceed with gluing.
Sew the tongue to the muzzle
Center the tongue between the lobes of the heart, placing it at the back of the muzzle and aligning the straight edge of the tongue over Rnd. 2 of the heart. With a tapestry needle, sew it firmly in place.
HEAD
In color Caramel (Amigurumi #7076).
Rnd. 1: work 6 sc in a magic ring (6).
Rnd. 2: 6 inc (12).
Rnd. 3: [1 sc, 1 inc] x 6 (18).
Rnd. 4: 3 sc, [1 sc, 1 inc] x 3, 3 sc, [1 sc, 1 inc] x 3 (24).
Rnd. 5: 3 sc, [1 sc, 1 inc, 1 sc] x 3, 3 sc, [1 sc, 1 inc, 1 sc] x 3 (30).
Rnd. 6: 2 sc, [3 sc, 1 inc] x 3, 3 sc, [3 sc, 1 inc] x 3, 1 sc (36).
Rnd. 7: 3 sc, [2 sc, 1 inc, 2 sc] x 3, 3 sc, [2 sc, 1 inc, 2 sc] x 3 (42).
Rnd. 8–17 (10 ROUNDS): 42 sc (42).
Insert the safety eyes between Rnd. 13 and 14, centered on the opposite side of the starting point of the rounds, leaving 5 visible st between them.
Note: The ideal eye size covers approx. 2 stitches in width. If necessary, adjust the eye size to fit your piece.
Rnd. 18: 3 sc, [2 sc, 1 dec, 2 sc] x 3, 3 sc, [2 sc, 1 dec, 2 sc] x 3 (36).
Rnd. 19: 2 sc, [3 sc, 1 dec] x 3, 3 sc, [3 sc, 1 dec] x 3, 1 sc (30).
Rnd. 20: 3 sc, [1 sc, 1 dec, 1 sc] x 3, 3 sc, [1 sc, 1 dec, 1 sc] x 3 (24).
Stuff the head with fiberfill. While stuffing, keep the top slightly rectangular to preserve the shape.
Rnd. 21: 3 sc, [1 sc, 1 dec] x 3, 3 sc, [1 sc, 1 dec] x 3 (18).
Rnd. 22: [1 sc, 1 dec] x 6 (12).
Rnd. 23: work only 5 dec (5). Leave the remaining 2 st unworked.
Add more stuffing if needed. Fasten off, leaving a yarn tail. Using a tapestry needle, weave the yarn tail through the front loop of each remaining stitch and pull tight to close. Weave in the yarn end.
Sew the muzzle between the eyes
Using sewing pins, center the muzzle between the eyes, over Rnds. 13 to 16. The tip of the heart (the upper part of the muzzle) should be aligned with the top of the eyes. With a tapestry needle, sew firmly along both sides of the heart.
Make the face details
- Using a tapestry needle and off-white yarn (Amigurumi Slim #8176), embroider the waterline at the bottom of each eye.
- If you wish, apply blush to the cheeks.
EARS (MAKE 2)
In color Craft (Amigurumi #7148).
Rnd. 1: work 6 sc in a magic ring (6).
Rnd. 2: 6 inc (12).
Rnd. 3: 12 sc (12).
Rnd. 4: [1 sc, 1 inc] x 6 (18).
Rnd. 5: [1 sc, 1 inc, 1 sc] x 6 (24).
Rnd. 6: 24 sc (24).
Rnd. 7: 21 sc, 1 dec, 1 sc (23).
Rnd. 8: 3 sc, 1 dec, 10 sc, 1 dec, 6 sc (21).
Rnd. 9: 3 sc, 1 dec, 9 sc, 1 dec, 2 sc, 1 dec, 1 sc (18).
Rnd. 10: 18 sc (18).
Rnd. 11: 16 sc, 1 dec (17).
Rnd. 12: 3 sc, 1 dec, 7 sc, 1 dec, 3 sc (15).
Rnd. 13: work only 4 sc (4). Leave the remaining 11 st unworked.
Flatten the ear opening so that the stitches line up. The ear doesn’t need to be stuffed.
Rnd. 14: sc in next 7 st through both layers to close the opening (7).
Fasten off, leaving a tail for sewing.
Sew the ears to the sides of the head
Before sewing, flatten the rounded part of the ear, shaping it into a shell-like form. This shape helps it fit perfectly on the side of the head. Using sewing pins, place the ears on the sides of the head, over Rnd. 7, leaving approx. 2 st of distance at eye level. With a tapestry needle, sew them firmly in place.
FRONT LEGS (MAKE 2)
Start in color Porcelain (Amigurumi #7564).
Rnd. 1: work 5 sc in a magic ring (5).
Rnd. 2: 5 inc (10).
Rnd. 3: 10 sc (10).
Change to color Caramel (Amigurumi #7076).
Rnd. 4: 3 sc, 2 dec, 3 sc (8).
Rnd. 5: 8 sc (8).
Rnd. 6: 1 sc, 1 inc, 3 sc, 1 inc, 2 sc (10).
Rnd. 7–9 (3 ROUNDS): 10 sc (10).
Rnd. 10: work only 2 sc (2). Leave the remaining 8 st unworked.
Fasten off. Lightly stuff the front leg with fiberfill.
BODY
In color Caramel (Amigurumi #7076).
Rnd. 1: work 6 sc in a magic ring (6).
Rnd. 2: 6 inc (12).
Rnd. 3: [1 sc, 1 inc] x 6 (18).
Rnd. 4: [1 sc, 1 inc, 1 sc] x 6 (24).
Rnd. 5: [3 sc, 1 inc] x 6 (30).
Rnd. 6–8 (3 ROUNDS): 30 sc (30).
Rnd. 9: 1 sc, [1 dec, 2 sc] x 4, 13 sc (26).
Rnd. 10: 14 sc, 1 dec, 6 sc, 1 dec, 2 sc (24).
On the next round, we'll join the front legs to the body. The last st of each leg will be the starting position for the join. Make sure that the decreases in Rnd. 4 of the front legs are facing you. If necessary, make some additional sc or undo some sc to ensure the correct position of the legs.
Rnd. 11: 1 sc in the body, sc into next 4 st through the first front leg and body at the same time, continue with 2 sc in the body, sc in next 4 st through the second front leg and body at the same time, 13 sc in the body (24).
Rnd. 12: 1 inc in the body. Continue making 1 inc, 5 sc into the first front leg (into the unworked stitches of the previous round), 2 sc in the body, 5 sc, 1 inc into the second front leg (into the unworked stitches). Return to the body and make 1 inc, 12 sc (32).
Rnd. 13: 32 sc (32).
Rnd. 14: 2 dec, 1 sc, 1 dec, 6 sc, 1 dec, 1 sc, 2 dec, 1 sc, 1 dec, [2 sc, 1 dec] x 2, 1 sc (23).
Rnd. 15: 23 sc (23).
Invisible fasten off, leaving a long yarn tail for sewing. Stuff the body firmly with fiberfill.
Note: As you stuff the piece, adjust the position of the front legs so they remain parallel and facing forward. When placing the piece on a flat surface, both front legs and body should touch the surface to ensure balance.
Sew the body to the head
With the help of pins, position the body at the base of the head, keeping the front legs facing forward and tilting the head slightly upward. At the front, the body should be positioned between Rnds. 21 and 22, and at the back between Rnds. 19 and 20. Using a tapestry needle, sew it firmly in place. If necessary, stuff the body with more fiberfill before closing the seam.
BACK LEGS (MAKE 2)
Start in color Porcelain (Amigurumi #7564).
Rnd. 1: work 5 sc in a magic ring (5).
Rnd. 2: 5 inc (10).
Rnd. 3: 10 sc (10).
Change to color Caramel (Amigurumi #7076).
Rnd. 4: 2 sc, 3 dec, 2 sc (7).
Rnd. 5: 1 sc, 4 inc, 1 sc, 1 inc (12).
Stuff the paw firmly with fiberfill. The rest of the piece will remain unstuffed.
Rnd. 6: 12 sc (12).
Rnd. 7: 3 sc, [1 inc, 1 sc] x 4, 1 sc (16).
Rnd. 8: 16 sc (16).
Rnd. 9: 8 dec (8).
Rnd. 10: work only 2 dec (2). Leave the remaining 4 st unworked.
Fasten off, leaving a long yarn tail for sewing. There is no need to add stuffing to the thigh.
Locate the central decrease of Rnd. 4 and, from this point, flatten the thigh, shaping it into a shell-like form. This shape will ensure that the leg fits perfectly on the side of the body when sewing. With the thigh flattened and using a tapestry needle, weave the yarn tail through the front loop of each remaining stitch and pull tight to close the opening. Then, weave the remaining yarn through the leg, bringing it out at the side of the piece, where it will later be used for sewing.
Sew the back legs to the sides of the body
Using sewing pins, place the back legs on both sides of the body, between Rnds. 5 and 9. The paws should be facing forward, and the decreases from Rnd. 4 facing upward, positioned slightly behind the front legs. The back paws should “slightly hug” the front paws, ensuring they remain in the correct position. Using a tapestry needle, sew only the rounded part of the thigh firmly in place.
Note:
Before sewing, check that the piece sits properly, with all four paws and body touching the surface. Adjust the position of the back legs, if necessary, to ensure balance.
TAIL
Start in color Porcelain (Amigurumi #7564).
Rnd. 1: work 4 sc in a magic ring (4).
Rnd. 2: [1 sc, 1 inc] x 2 (6).
Change to color Caramel (Amigurumi #7076).
Rnd. 3: [1 sc, 1 inc] x 3 (9).
Rnd. 4: 9 sc (9).
Rnd. 5: 4 sc, 1 inc, 4 sc (10).
Rnd. 6–7 (2 ROUNDS): 10 sc (10).
Rnd. 8: 4 sc, 1 dec, 4 sc (9).
Rnd. 9: 9 sc (9).
Rnd. 10: 2 sc, [1 dec, 1 sc] x 2, 1 sc (7).
Rnd. 11: work only 1 sc (1). Leave the remaining 6 st unworked.
Lightly stuff the tail with fiberfill up to Rnd. 8. Flatten the tail opening so that the stitches line up.
Rnd. 12: sc in next 3 st through both layers to close the opening (3).
Fasten off, leaving a tail for sewing.
Sew the tail to the back
Using sewing pins, position the tail at the center back of the body, over Rnd. 4 and 7. With a tapestry needle, sew it firmly in place.
PUMPKIN CAPE
The cape, shaped like a pumpkin, will be worked in three parts.
Note: Although the cape is crocheted with Amigurumi Slim yarn, to make the piece softer, use the same hook size as the one used for the body.
CAPE
In color Dark Cheddar (Amigurumi Slim #4131).
Ch 30. Crochet in rows.
Note: Ch do not count in the total stitches count of the rows.
Row 1: starting into the second ch from the hook, make 29 sc, ch 1, turn (29).
Row 2: 14 sc, 1 inc, 14 sc, ch 1, turn (30).
- Row 3: 12 sc, 1 inc, 4 sc, 1 inc, 12 sc, ch 1, turn (32).
- Row 4: 10 sc, 1 inc, 10 sc, 1 inc, 10 sc, ch 1, turn (34).
- Row 5: 16 sc, 1 inc, 17 sc, ch 1, turn (35).
- Row 6: 35 sc, ch 1, turn (35).
Row 7: [1 sc, into the next st work *2 hdc, ch 2, 2 hdc*, continue with 1 sc, skip next st] x 8, 1 sc, into the next st work *2 hdc, ch 2, 2 hdc*, continue with 1 sc (54).
Fasten off and weave in the yarn end.
CAPE COLLAR
In color Pistachio (Amigurumi Slim #5800). Continue working in rows.
Row 1: leaving the ruffles facing you and wrong side of the Row 1 of the cape facing down, pull up a loop of yarn into the remaining loop of the first chain made to start the cape (this loop counts as the first stitch of the row). Work 28 slst into the remaining loops of the foundation chain, turn (29).
Note: Do not make a turning ch at the end of Row 1.
Row 2: work this row always in BLO, skip the first st, [1 sc, into the next st work *2 hdc, ch 2, 2 hdc*, 1 sc] x 4, continue with 1 sc, 1 hdc-inc, ch 2, 1 hdc-inc, 1 sc, [1 sc, into the next st work *2 hdc, ch 2, 2 hdc*, 1 sc] x 4 (54).
Fasten off and weave in the yarn end.
STRAPS
To make the straps, cut a 30 cm yarn tail of Pistachio yarn (Amigurumi Slim #5800). Using a tapestry needle, baste this thread between Row 1 of the cape and collar. Leave equal-sized straps on each side. To prevent the end from fraying, tie a knot in the tail at each end. Put the cape on the dog and tie the straps at the front, forming a bow.
PUMPKIN HAT
The pumpkin hat will be worked in three parts.
Note: Although the hat is crocheted with Amigurumi Slim yarn, to make the piece softer, use the same hook size as the one used for the body.
PART 1- STEM TOP
In color Pistachio (Amigurumi Slim #5800).
Rnd. 1: start 6 sc in a magic ring (6).
Rnd. 2: 6 BLO-sc (6).
Rnd. 3: 1 dec, 4 sc (5).
Rnd. 4: 1 dec, 3 sc (4).
Rnd. 5: 4 sc (4).
Fasten off, leaving a long tail for sewing. The stem doesn’t need to be stuffed. Using a tapestry needle, weave the yarn tail through the front loop of each remaining stitch and pull tight to close the opening. Don’t weave in the yarn end, as it will be used later for sewing.
PART 2 – STEM BASE
In color Pistachio (Amigurumi Slim #5800).
Rnd. 1: make [1 sc, 1 picot] x 6 in a magic ring (6 - picots don’t count in the stitch count of the round).
Fasten off, leaving a long tail for sewing. Tighten the magic ring as usual. Using a tapestry needle, make a false st by passing the needle through the first sc and inserting it back into the center of the same stitch where you came from. Fasten off and weave in the yarn end.
PART 3 - PUMPKIN
In color Dark Cheddar (Amigurumi Slim #4131).
Rnd. 1: start 6 sc in a magic ring (6).
Rnd. 2: 6 inc (12).
Rnd. 3: [1 BLO-sc, 1 inc] x 6 (18).
Rnd. 4: [1 BLO-sc, 2 inc] x 6 (30).
Rnd. 5: [1 BLO-sc, 1 inc, 2 sc, 1 inc] x 6 (42).
Rnd. 6: [1 BLO-sc, 1 inc, 4 sc, 1 inc] x 6 (54).
Rnd. 7: [1 BLO-sc, 1 inc, 6 sc, 1 inc] x 6 (66).
Rnd. 8–13 (6 ROUNDS): [1 BLO-sc, 10 sc] x 6 (66).
Rnd. 14: [skip next st, 10 sc] x 6 (60).
Rnd. 15: 60 slst (60).
Invisible fasten off and weave in the yarn end.
ASSEMBLY AND FINISHING TOUCHES
Stem assembly
With a tapestry needle, sew Part 1 of the stem firmly to the center of Part 2.
Then, place the stem on the top of the pumpkin, at the center of the magic ring, aligning each picot with the ridges of the pumpkin. Pin in place. Either glue or, using a tapestry needle, sew the stem firmly to the top of the hat.
Embroider the pumpkin details
- Eyes: using a crewel embroidery needle no. 9 and 1 strand of black embroidery thread (Maxi Mouliné #900), embroider the eyes, over Rnd. 11. Each eye should be approx. 2 st wide and 1 rnd high, keeping 4 st apart.
- Nose: using a crewel needle no. 9 and 1 strand of black embroidery thread (Maxi Mouliné #900), embroider the nose centered between the eyes, over Rnd. 12. The nose should measure approx. 1 st wide and 1 rnd tall.
Finishing touches
Before placing the hat on the dog, gently shape the pumpkin ridges with your fingers. Then, position the hat on the head, making sure the embroidered details face forward.
YOUR PUMPKIN DOG IS READY!
Designer: Jenifer - LovLoops