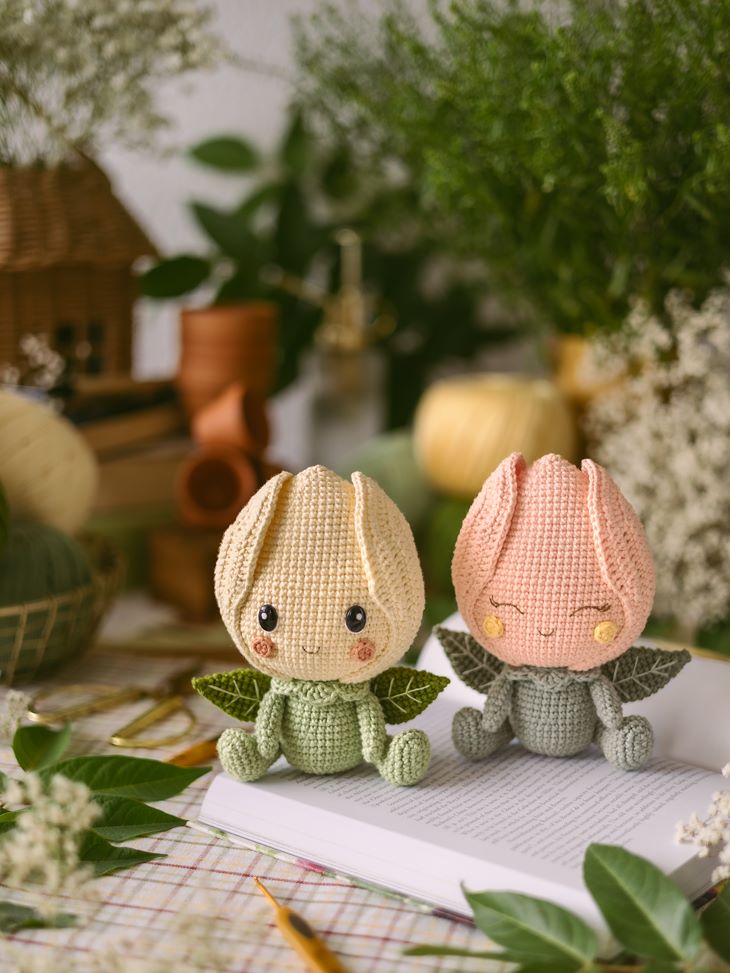
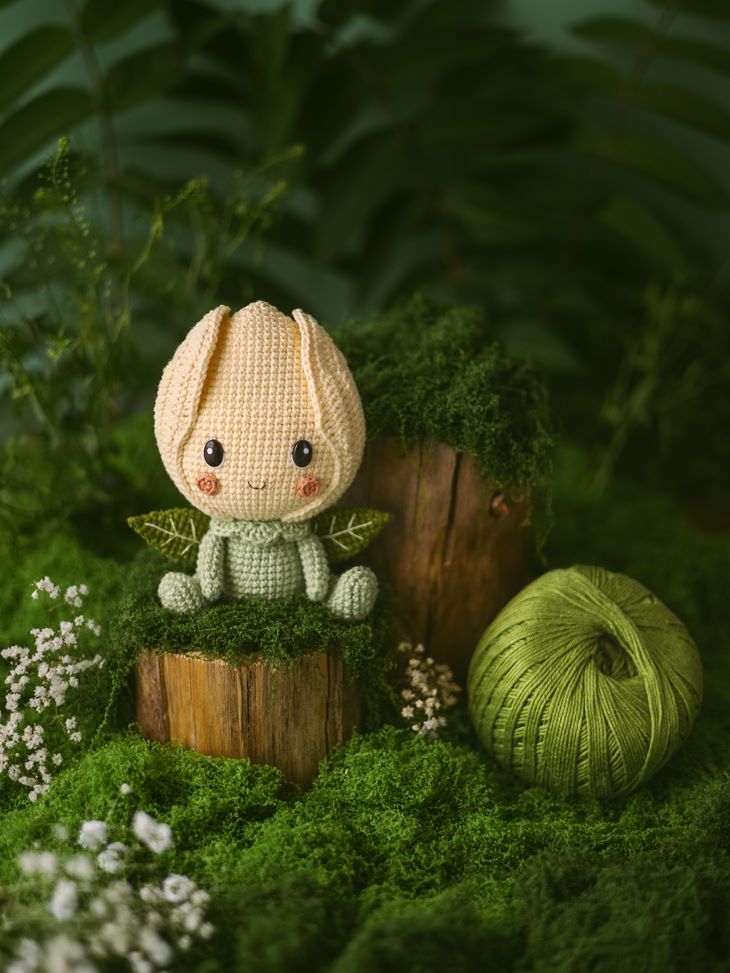
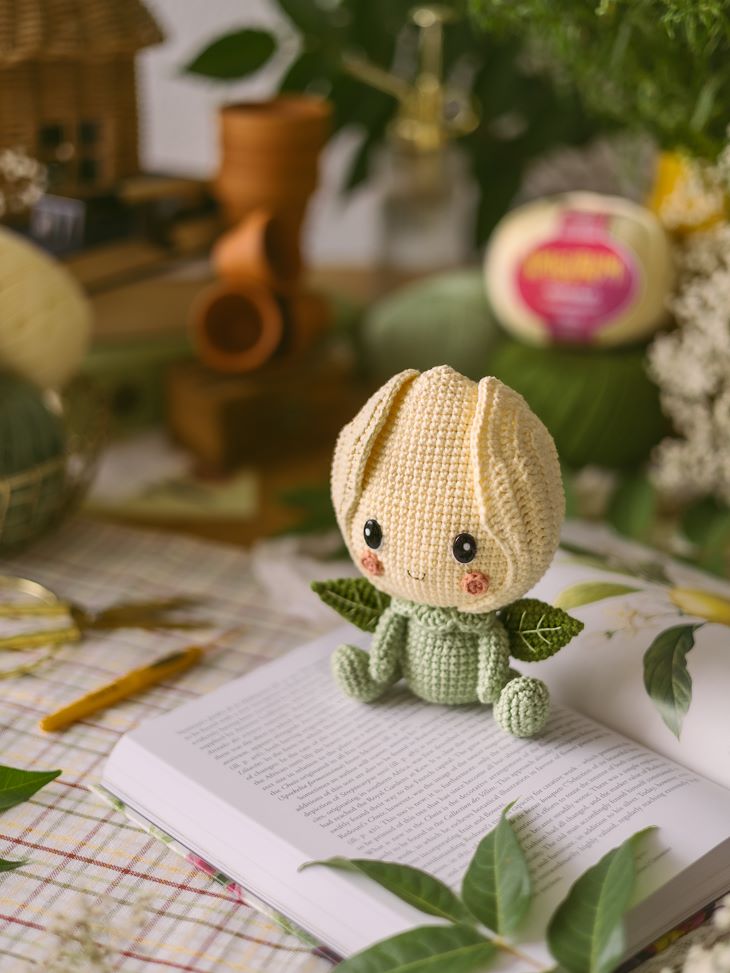
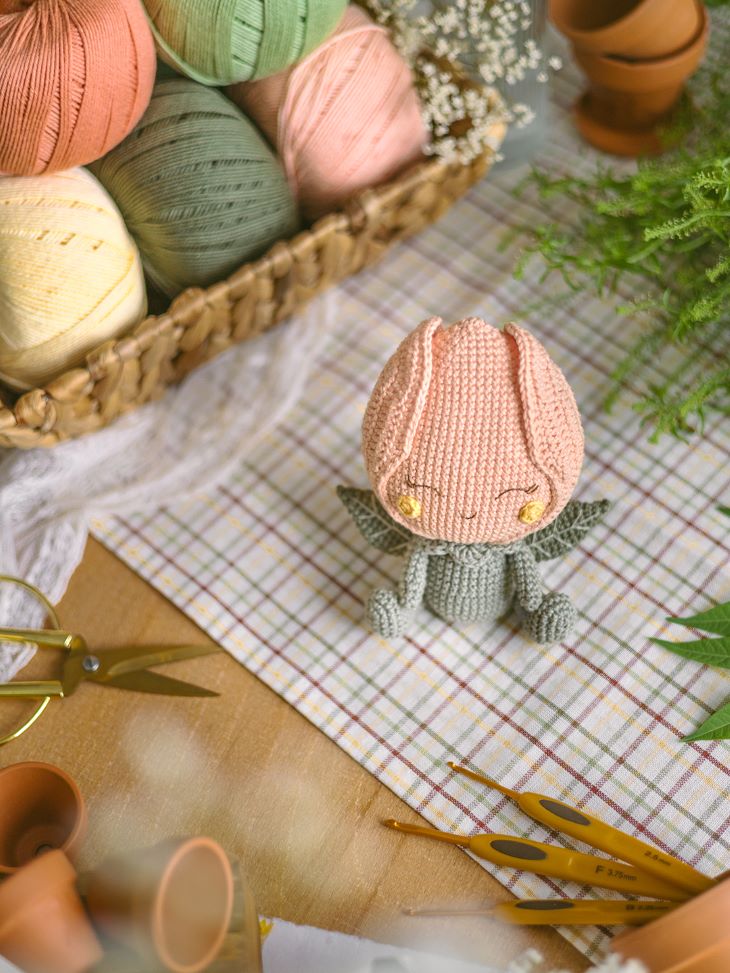
Tulip - LovLoops
MATERIAIS
- Círculo Amigurumi yarn in colors:
- YELLOW TULIP:
- Cream #1112;
- Perroquet #5741;
- Jungle #5089;
- Tropicalia #4171.
- White #8001 (leftover to embroider waterlines in safety eyes version).
- SALMON TULIP:
- Breeze #3047;
- Eucaliptus #5745;
- Forest green #5368;
- Solar #1317.
- Embroidery thread Maxi Mouliné in colors:
- Brown #880 (for face details);
- Light green #711 (for the veins of the yellow tulip leaves);
- Light green #651 (for the veins of the salmon tulip leaves).
- 2.2 mm Crochet hook.
- Embroidery needles (Tapestry no. 22 and Crewel no. 7).
- 10 mm Oval safety eyes (2 units – for safety eyes version).
- Stitch markers.
- Sewing pins.
- Scissor.
- Universal plier.
- Fiberfill.
EXECUÇÃO
SIZE
- Using Círculo Amigurumi yarn, 2.2 mm crochet hook, and X single crochet, the tulip will be approx. 16 cm tall.
SKILL LEVEL
- Beginner-intermediate.
ABBREVIATIONS (US Terms)
- Rnd(s): round(s).
- St: stitch(es).
- Ch: chain stitch.
- Slst: slip stitch crochet.
- Sc: single crochet.
- Inc: single crochet increase (two sc into the same stitch).
- Dec: single crochet decrease (two sc closed together).
- Hdc: half double crochet.
- Dc: double crochet.
- [...] x n: repeat the instructions, within brackets, n times.
- (...): total number of stitches in a round/row.
CROCHETING INSTRUCTIONS
This pattern includes two tulip versions: one yellow and one salmon. The specific colors for each version are listed in the materials section. Throughout the step-by-step instructions, both color options will be provided so you can follow the combination that matches your chosen version.
ARMS (MAKE 2)
In color perroquet (#5741) or eucaliptus (#5745).
Rnd. 1: work 6 sc in a magic ring (6).
Rnd. 2: 6 sc (6).
Rnd. 3: [1 sc, 1 inc] x 3 (9).
Rnd. 4–9 (6 ROUNDS): 9 sc (9).
Rnd. 10: [1 sc, 1 dec] x 3 (6).
Lightly stuff the arm with fiberfill up to Rnd. 8. Flatten the arm opening so that the stitches line up.
Rnd. 11: sc in next 3 st through both layers to close the opening.
Fasten off, leaving a tail for sewing.
LEGS (MAKE 2)
In color perroquet (#5741) or eucaliptus (#5745).
Ch 5. Stitches are worked around both sides of the foundation chain.
Rnd. 1: start in the second ch from the hook, 3 sc, 3 sc into the last st. Continue on the other side of the foundation chain, 2 sc, 1 inc (10).
Rnd. 2: 1 inc, 2 sc, 3 inc, 2 sc, 2 inc (16).
Rnd. 3: 1 sc, 1 inc, 3 sc, [1 inc, 1 sc] x 3, 2 sc, 1 inc, 1 sc, 1 inc (22).
- Rnd. 4: 22 sc (22).
- Rnd. 5: 6 sc, [1 dec, 1 sc] x 3, 7 sc (19).
- Rnd. 6: 6 sc, 3 dec, 7 sc (16).
- Rnd. 7: [2 sc, 1 dec] x 4 (12).
Stuff the foot firmly with fiberfill. To keep the foot nicely shaped, make sure to maintain its elliptical form while stuffing.
Rnd. 8–11 (4 ROUNDS): 12 sc (12).
Rnd. 12: [1 dec, 1 sc] x 4 (8).
Rnd. 13: 1 sc, 1 dec, 2 sc, 1 dec, 1 sc (6).
Fasten off, leaving a long tail for sewing. Lightly stuff the leg with fiberfill. Using a tapestry needle, weave the yarn tail through the front loop of each remaining stitch and pull tight to close the opening. Then, weave the remaining yarn through the leg, bringing it out at the back of the leg, between Rnd. 11 and 12, where it will later be used for sewing.
BODY AND HEAD
Start in color perroquet (#5741) or eucaliptus (#5745).
Rnd. 1: work 6 sc in a magic ring (6).
Rnd. 2: 6 inc (12).
Rnd. 3: [1 sc, 1 inc] x 6 (18).
Rnd. 4: [1 sc, 1 inc, 1 sc] x 6 (24).
Rnd. 5: [3 sc, 1 inc] x 6 (30).
Rnd. 6: [2 sc, 1 inc, 2 sc] x 6 (36).
Rnd. 7–10 (4 ROUNDS): 36 sc (36).
Rnd. 11: [7 sc, 1 dec] x 4 (32).
Rnd. 12–13 (2 ROUNDS): 32 sc (32).
Rnd. 14: [3 sc, 1 dec, 3 sc] x 4 (28).
Rnd. 15–16 (2 ROUNDS): 28 sc (28).
Rnd. 17: [5 sc, 1 dec] x 4 (24).
Rnd. 18–20 (3 ROUNDS): 24 sc (24).
Stuff the body firmly with fiberfill. Continue stuffing as you go.
From this point on, we'll start the head. Switch to color cream (#1112) or breeze (#3047).
Tip: To keep the head nicely shaped, make sure to maintain its elliptical form while stuffing.
Rnd. 21: 24 inc (48).
Rnd. 22: 10 sc, [1 inc, 1 sc] x 3, 18 sc, [1 inc, 1 sc] x 3, 8 sc (54).
Rnd. 23: 54 sc (54).
Rnd. 24: 10 sc, [1 inc, 2 sc] x 3, 18 sc, [1 inc, 2 sc] x 3, 8 sc (60).
Rnd. 25–26 (2 ROUNDS): 60 sc (60).
Rnd. 27: 10 sc, [1 inc, 3 sc] x 3, 18 sc, [1 inc, 3 sc] x 3, 8 sc (66).
Rnd. 28–36 (9 ROUNDS): 66 sc (66).
Rnd. 37: 10 sc, [1 dec, 3 sc] x 3, 18 sc, [1 dec, 3 sc] x 3, 8 sc (60).
Rnd. 38–40 (3 ROUNDS): 60 sc (60).
For the version with safety eyes, insert the eyes on the side opposite to the starting point of the rounds, between Rnd. 32 and 33, leaving 9 visible sts between them. For the embroidered eyes version, full instructions can be found in the “Assembling and finishing touches” section. If you wish to embroider the eyes before completing the piece, please refer to that section in advance.
Rnd. 41: 9 sc, [1 dec, 3 sc] x 3, 15 sc, [1 dec, 3 sc] x 3, 6 sc (54).
Rnd. 42–43 (2 ROUNDS): 54 sc (54).
Rnd. 44: 8 sc, [1 dec, 3 sc] x 3, 12 sc, [1 dec, 3 sc] x 3, 4 sc (48).
Rnd. 45: 48 sc (48).
Rnd. 46: 6 sc, [1 dec, 3 sc] x 3, 9 sc, [1 dec, 3 sc] x 3, 3 sc (42).
Rnd. 47: 5 sc, [1 dec, 3 sc] x 3, 6 sc, [1 dec, 3 sc] x 3, 1 sc (36).
Rnd. 48: 36 sc (36).
Rnd. 49: 3 sc, [1 dec, 3 sc] x 3, 3 sc, [1 dec, 3 sc] x 3 (30).
Rnd. 50: 30 sc (30).
Rnd. 51: 2 sc, [1 dec, 2 sc] x 3, 4 sc, [1 dec, 2 sc] x 3 (24).
Rnd. 52: 2 sc, [1 dec, 1 sc] x 3, 3 sc, [1 dec, 1 sc] x 3, 1 sc (18).
Rnd. 53: 1 sc, 3 dec, 3 sc, 3 dec, 2 sc (12).
Rnd. 54: 6 dec (6).
Add more stuffing if needed. Fasten off, leaving a yarn tail. Using a tapestry needle, weave the yarn tail through the front loop of each remaining stitch and pull tight to close the opening. Weave in the yarn end.
PETALS (MAKE 2)
In color cream (#1112) or breeze (#3047). Crochet in rows.
Note: The ch at the end of each row doesn’t count towards the total stitch count.
Ch 25. Stitches are worked around both sides of the foundation chain.
Tip: Pay attention to the changes in crochet stitches throughout the rows!
Row 1: start in the second ch from the hook, 10 sc, 13 hdc, 5 hdc into the last st. Continue on the other side of the foundation chain, 13 hdc, 10 sc, ch 1, turn (51).
- Row 2: 10 sc, 2 hdc, 11 dc, 2 hdc into next st, 1 hdc, 3 hdc into next st, 1 hdc, 2 hdc into next st, 11 dc, 2 hdc, 10 sc, ch 1, turn (55).
- Row 3: 1 inc, 10 sc, 2 hdc, 10 dc, 1 hdc, 2 hdc into next st, 2 hdc, 3 hdc into next st, 2 hdc, 2 hdc into next st, 1 hdc, 10 dc, 2 hdc, 10 sc, 1 inc, ch 1, turn (61).
- Row 4: 13 sc, 2 hdc, 9 dc, [1 hdc, 2 hdc into next st] x 2, 2 hdc, 3 hdc into next st, 2 hdc, [2 hdc into next st, 1 hdc] x 2, 9 dc, 2 hdc, 13 sc, ch 1, turn (67).
- Row 5: 14 sc, 2 hdc, 8 dc, 9 hdc, 3 hdc into next st, 9 hdc, 8 dc, 2 hdc, 14 sc, ch 1, turn (69).
Row 6: 1 inc, 14 sc, 2 hdc, 7 dc, 5 hdc, 5 sc, 3 sc into next st, 5 sc, 5 hdc, 7 dc, 2 hdc, 14 sc, 1 inc (73).
Fasten off, leaving an approx. 85 cm yarn tail for sewing.
COLLAR
In color perroquet (#5741) or eucaliptus (#5745).
Tip: For a good fit of the collar around the neck, avoid tightening the starting chains too much. If needed, use a larger crochet hook.
Ch 25. Starting into the second ch from the hook, make [1 slst, skip the next ch, make 5 dc into next ch, skip the next ch] x 5, 1 slst, skip the next ch, make 5 dc into next ch, 1 slst (37).
Fasten off, leaving a tail for sewing.
CHEEKS (MAKE 2)
In color tropicalia (#4171) or solar (#1317).
Rnd. 1: work 6 sc in a magic ring (6).
Invisible fasten off, leaving a long tail for sewing.
LEAVES (MAKE 2)
In color jungle (#5089) or forest green (#5368).
Rnd. 1: work 8 sc in a magic ring (8).
Rnd. 2: [2 inc, 2 sc] x 2 (12).
Rnd. 3: 12 sc (12).
Rnd. 4: 1 sc, 2 inc, 4 sc, 2 inc, 3 sc (16).
Rnd. 5–8 (4 ROUNDS): 16 sc (16).
Rnd. 9: 2 sc, 1 dec, 6 sc, 1 dec, 4 sc (14).
Rnd. 10: 2 sc, 1 dec, 5 sc, 1 dec, 3 sc (12).
Rnd. 11: 1 sc, 1 dec, 4 sc, 1 dec, 3 sc (10).
Rnd. 12: 1 sc, 1 dec, 3 sc, 1 dec, 2 sc (8).
Rnd. 13: 1 dec, 2 sc, 1 dec, 2 sc (6).
Rnd. 14: 3 dec (3).
Fasten off, leaving a long tail for sewing. The leaves don’t need stuffing. Using a tapestry needle, weave the yarn tail through the front loop of each remaining stitch and pull tight to close the opening. Then, pass the remaining yarn tail to the opposite side of the leaf (the magic ring side), where it will be used for sewing.
ASSEMBLING AND FINISHING TOUCHES
Embroider the face and leaves
- Safety eyes version: using a tapestry needle and white yarn (Amigurumi #8001), embroider the waterline at the bottom of each eye.
- Embroidered eyes version: using a crewel embroidery needle and 2 strands of brown embroidery thread (Maxi Mouliné #880), embroider the eyes, over Rnd. 32 and 33. Each eye should be approx. 5 sts wide and 2 rounds high, keeping 6 sts apart.
- Mouth: using a crewel needle and 1 strand of brown embroidery thread (Maxi Mouliné #880), embroider the mouth between the cheeks, centered over Rnd. 28 (safety eyes version) or Rnd. 29 (embroidered eyes version). The mouth should be approx. 2 sts wide and 1 round high.
- Leaf veins: using a crewel needle and 3 strands of green embroidery thread (Maxi Mouliné #711 or #651), embroider veins on both sides of each leaf.
Sew the cheeks below the eyes
- Safety eyes version: Using sewing pins, position the cheeks just below the eyes, between Rnd. 27 and 29, leaving 11 visible sts between them. With a tapestry needle, sew firmly.
- Embroidered eyes version: Using sewing pins, position the cheeks just below the eyes, between Rnd. 28 and 30, leaving 12 visible sts between them. With a tapestry needle, sew firmly.
Sew the petals to the sides of the head
Using sewing pins, position the petals on the sides of the head, aligning the straight base of each petal between Rnds. 20 and 21, leaving an equal number of stitches between them at the front and back. With a tapestry needle, sew firmly along the base of the petals. Continue sewing the sides of the petals up to Rnd. 37. The upper portion of the petals should remain loose and unsewn.
Sew the legs and arms to the sides of the body
- Legs: using sewing pins, position the legs on the sides of the body, between Rnd. 6 and 9. The feet should be facing forward in a sitting position. With a tapestry needle, sew the back of the leg firmly.
- Arms: using sewing pins, position the arms slightly diagonally on both sides of the body, between Rnd. 16 and 18. The arms should be facing forward, between the legs. With a tapestry needle, sew firmly.
Tip: Align the arms and legs so that they form an imaginary straight line along the side of the head, passing through the center of the petals. Before sewing, ensure the piece stays balanced while sitting without support. Adjust the position of the legs, if necessary, to ensure balance.
Close the collar around the neck
Wrap the collar around the neck, positioning it between Rnd. 19 and 20, with the ends of the collar facing the back. Join the ends using a tapestry needle and weave in the yarn ends. Sewing the collar completely around the neck is unnecessary, as the fit of the piece holds it securely.
Sew the leaves on the back of the body
Flat the leaves and using sewing pins, position the leaves on the back, right behind the arms, between Rnd. 12 and 15. The tips of the leaves should be facing upward, forming an angle of approx. 45° about the base of the piece. With a tapestry needle, sew firmly the round part only.
Designer: Jenifer - LovLoops