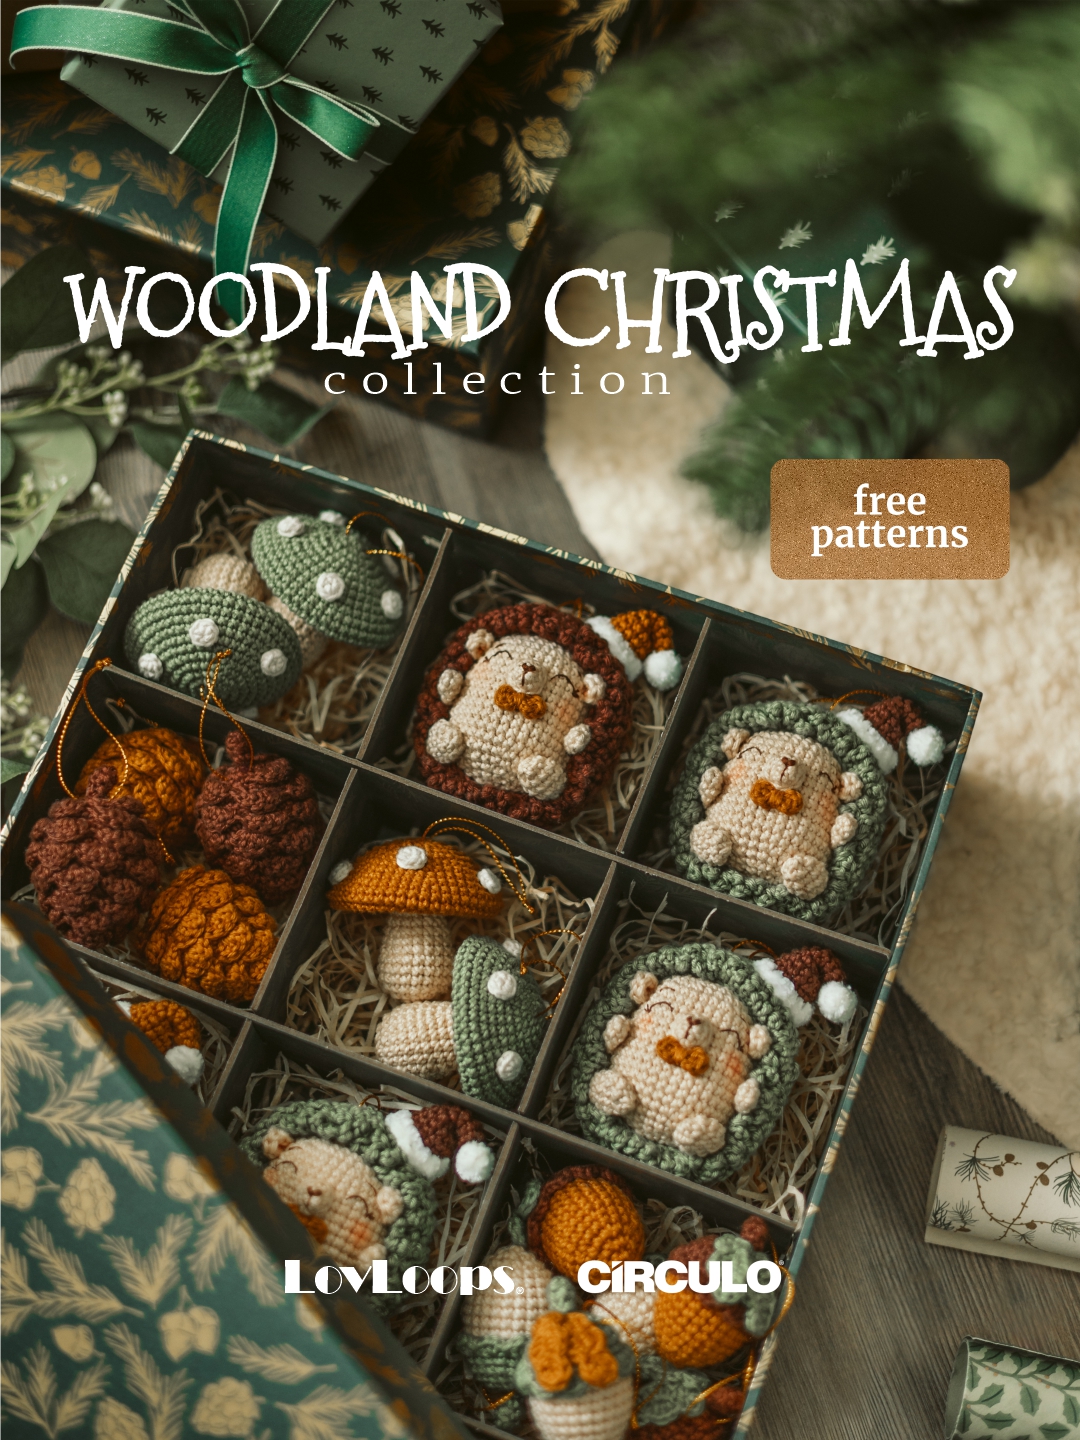
Woodland Christmas Collection - LovLoops

MATERIALS
- Círculo Amigurumi yarn in colors:
- Brownie #7400; Dulce de leche #7077; Eco #5083; Natural #20;Porcelain #7564.
- Círculo Amigurumi Pelúcia color White #8001 (for hedgehog’s hat).
- Embroidery thread Maxi Mouliné color Dark Brown #880 (for hedgehog’s details).
- 2.2 mm Crochet hook.
- Embroidery needles (Tapestry no. 22, Crewel no. 9).
- Fiberfill.
- Stitch markers.
- Sewing pins.
- Scissors.
- Pliers.
- Tweezers
- Silicone glue or fabric glue.
- Blush (for cheeks and ears - optional).
- Gold cord (for ornament hangers - optional).
EXECUTION
SKILL LEVEL
- Beginner-intermediate.
ABBREVIATIONS (US Terms)
- BLO: back loops only.
- Ch: chain stitch.
- Dc: double crochet.
- Dec: single crochet decrease (two sc closed together).
- Hdc: half double crochet.
- Inc: single crochet increase (two sc into the same stitch).
- Rnd: round(s).
- Sc: single crochet.
- Slst: slip stitch crochet.
- St: stitch(es).
- [...] x n: repeat the instructions, within brackets, n times.
- *…*: make all stitches, within asterisks, into the same base stitch.
- (...): total number of stitches in a round/row.
SIZES
- Using Círculo Amigurumi yarn, 2.2 mm crochet hook, and X single crochet, your pieces will measure approximately:
- Acorn: 1.97 in (5 cm).
- Mushroom: 2.16 in (5.5 cm).
- Pinecone: 2.36 in (6 cm).
- Hedgehog (without Santa hat): 2.95 in (7.5 cm).
- Hedgehog (with Santa hat): 3.94 in (10 cm).
Crocheting instructions
Each design in this collection includes two color options. Choose your favorite palette and use it consistently throughout the pattern. Refer to the photos for color placement.
ACORN
Palette option 1: Dulce de leche #7077 (acorn body), Brownie #7400 (acorn cap and stem), Eco #5083 (leaves).
Palette option 2: Porcelain #7564 (acorn body), Eco #5083 (acorn cap and stem), Dulce de leche #7077 (leaves).
ACORN BODY (NUT)
In color Dulce de leche (Amigurumi #7077) or Porcelain (Amigurumi #7564).
- Rnd. 1: work 6 sc in a magic ring (6).
- Rnd. 2: 6 inc (12).
- Rnd. 3: [1 sc, 1 inc] x 6 (18).
- Rnd. 4: [1 sc, 1 inc, 1 sc] x 6 (24).
- Rnd. 5–11 (7 ROUNDS): 24 sc (24).
- Rnd. 12: [1 sc, 1 dec, 1 sc] x 6 (18).
- Rnd. 13: 18 sc (18).
- Rnd. 14: [1 sc, 1 dec] x 6 (12).
- Stuff the nut firmly with fiberfill.
- Rnd. 15: 6 dec (6).
Add more stuffing if needed. Fasten off, leaving a yarn tail. Using a tapestry needle, weave the yarn tail through the front loop of each remaining stitch and pull tight to close the opening. Weave in the yarn end.
Note: When closing the opening and weaving in the yarn end, be careful to keep the base of the acorn slightly pointed.
ACORN CAP (CUPULE)
In color Brownie (Amigurumi #7400) or Eco (Amigurumi #5083).
- Rnd. 1: work 7 sc in a magic ring (7).
- Rnd. 2: 7 inc (14).
- Rnd. 3: [1 sc, 1 inc] x 7 (21).
- Rnd. 4: 20 sc, 1 inc (22).
- Rnd. 5–6 (2 ROUNDS): 22 sc (22).
- Rnd. 7: [1 slst, 3 hdc into next st] x 11 (44).
Invisible fasten off and weave in the yarn end.
Attach the cap to the top of the acorn body
Using silicone glue, attach the cap to the top of the acorn body. The top of the acorn body is the more rounded part of the piece.
STEM
- In color Brownie (Amigurumi #7400) or Eco (Amigurumi #5083).
Rnd. 1: work 5 sc in a magic ring (5). - Rnd. 2: 5 BLO-sc (5).
- Rnd. 3: 3 sc, 1 dec (4).
Fasten off, leaving a long tail for sewing. The stem doesn’t need to be stuffed. Using a tapestry needle, weave the yarn tail through the front loop of each remaining stitch and pull tight to close the opening. Don’t weave in the yarn end, as it will be used later for sewing.
Sew the stem to the top of the acorn
Using sewing pins, position the stem at the top center of the acorn. With a tapestry needle, sew it firmly in place.
LEAVES (MAKE 2)
In color Eco (Amigurumi #5083) or Dulce de leche (Amigurumi #7077).
Ch 6. Stitches are worked around both sides of the foundation chain.
Rnd. 1: starting into the second ch from the hook, make [*1 sc, 2 hdc*, 1 slst] x 2, 4 hdc in the last st. Continue on the other side of the foundation chain and work 1 slst, *2 hdc, 1 sc*, 1 slst, *2 hdc* (19).
Invisible fasten off and weave in the yarn end.
Attach the leaves to the top of the acorn and add a hanging cord
Using silicone/fabric glue, attach the leaves to the top of the acorn, close to the stem. If you wish, make a hanging loop for the ornament using a gold cord.
MUSHROOM
Palette option 1: Dulce de leche #7077 and Porcelain #7564 (cap), Porcelain #7564 (stem), Natural #20 (cap details).
Palette option 2: Eco #5083 and Porcelain a #7564 (cap), Porcelain #7564 (stem), Natural #20 (cap details).
CAP
Start in color Dulce de leche (Amigurumi #7077) or Eco (Amigurumi #5083).
- Rnd. 1: work 7 sc in a magic ring (7).
- Rnd. 2: 7 inc (14).
- Rnd. 3: [1 sc, 1 inc] x 7 (21).
- Rnd. 4: [1 sc, 1 inc, 1 sc] x 7 (28).
- Rnd. 5: [3 sc, 1 inc] x 7 (35).
- Rnd. 6: 35 sc (35).
- Rnd. 7: [2 sc, 1 inc, 2 sc] x 7 (42).
- Rnd. 8: 42 sc (42).
- Rnd. 9: [5 sc, 1 inc] x 7 (49).
- Rnd. 10–13 (4 ROUNDS): 49 sc (49).
Change to color Porcelain (Amigurumi #7564).
- Rnd. 14: 49 sc (49).
- Rnd. 15: [5 sc, 1 dec] x 7 (42).
- Rnd. 16: [2 sc, 1 dec, 2 sc] x 7 (35).
- Rnd. 17: [3 sc, 1 dec] x 7 (28).
- Rnd. 18: [1 sc, 1 dec, 1 sc] x 7 (21).
- Rnd. 19: [1 sc, 1 dec] x 7 (14).
- Rnd. 20: 7 dec (7).
Fasten off and weave in the yarn end.
Note: Leave the opening unclosed, as you will use it to add stuffing after shaping the cap.
Locate the Rnd. 12 and, from this point, flatten the cap, shaping it into a shell-like form. The lighter part should face the inside of the concave area.
After shaping, use tweezers to add a small amount of fiberfill into the space inside the cap, just above the opening. The piece should keep its shell shape, so add only enough stuffing to fill the space without making the cap bulge.
STEM
In color Porcelain (Amigurumi #7564).
- Rnd. 1: work 6 sc in a magic ring (6).
- Rnd. 2: 6 inc (12).
- Rnd. 3: [1 sc, 1 inc] x 6 (18).
- Rnd. 4: [5 sc, 1 inc] x 3 (21).
- Rnd. 5–7 (3 ROUNDS): 21 sc (21).
- Rnd. 8: [5 sc, 1 dec] x 3 (18).
- Rnd. 9: 18 sc (18).
- Rnd. 10: [4 sc, 1 dec] x 3 (15).
- Rnd. 11–12 (2 ROUNDS): 15 sc (15).
- Rnd. 13: [3 sc, 1 dec] x 3 (12).
- Rnd. 14: 12 sc (12).
Stuff the stem firmly with fiberfill. Fasten off, leaving a long tail for sewing.
Sew the stem under the cap
Using sewing pins, position the stem opening at the center of the light part of the cap, between Rnd. 19 and 20. With a tapestry needle, sew it firmly in place. If necessary, stuff the stem with more fiberfill before closing the seam.
Note: To make sewing easier, turn the cap inside out (reversing the shell shape). After sewing, return it to its original shape.
CAP DETAILS (MAKE 5)
In color Natural (Amigurumi #20).
Rnd. 1: work 6 sc in a magic ring (6).
Invisible fasten off and weave in the yarn end.
Attach the details to the cap and add a gold cord
- Position the details on top of the mushroom cap and secure them in place with silicone/fabric glue. If you wish, make a hanging loop for the ornament using a gold cord.
PINECONE
Palette option 1: Dulce de leche #7077 (pinecone base, scales, and stem).
Palette option 2: Brownie #7400 (pinecone base, scales, and stem).
PINECONE BASE
In color Dulce de leche (Amigurumi #7077) or Brownie (Amigurumi #7400).
- Rnd. 1: work 6 sc in a magic ring (6).
- Rnd. 2: 6 inc (12).
- Rnd. 3: [1 sc, 1 inc] x 6 (18).
- Rnd. 4: [1 BLO-sc, 1 BLO-inc, 1 BLO-sc] x 6 (24).
- Rnd. 5: 24 sc (24).
- Rnd. 6: [3 BLO-sc, 1 BLO-inc] x 6 (30).
- Rnd. 7: 30 sc (30).
- Rnd. 8: 30 BLO-sc (30).
- Rnd. 9: 30 sc (30).
- Rnd. 10: 30 BLO-sc (30).
- Rnd. 11: [3 sc, 1 dec] x 6 (24).
- Rnd. 12: 24 BLO-sc (24).
- Rnd. 13: [1 sc, 1 dec, 1 sc] x 6 (18).
- Rnd. 14: 18 BLO-sc (18).
- Rnd. 15: [1 sc, 1 dec] x 6 (12).
- Rnd. 16: 12 BLO-sc (12).
Stuff the piece firmly with fiberfill.
- Rnd. 17: 6 dec (6).
Add more stuffing if needed. Fasten off, leaving a yarn tail. Using a tapestry needle, weave the yarn tail through the front loop of each remaining stitch and pull tight to close the opening. Weave in the yarn end.
SCALES
In color Dulce de leche (Amigurumi #7077) or Brownie (Amigurumi #7400).
To create the pinecone scale effect, we’ll work into all remaining front loops from the rounds worked in BLO at the base. With Rnd. 17 of the pinecone base facing you, pull up a loop of yarn through the last remaining front loop of Rnd. 16 and make ch 1. The first scale will begin in this same loop.
Work *1 hdc, 3 dc, 1 hdc* into the first loop, skip the next two remaining loops, and make 1 slst into the next loop. Repeat this sequence through all remaining loops of the base. In total, your pinecone will have 39 scales.
When you reach the end of the loops, fasten off and weave in the yarn end. Using your fingers, gently adjust the scale shape around the entire pinecone.
STEM
- In color Dulce de leche (Amigurumi #7077) or Brownie (Amigurumi #7400).
Rnd. 1: work 5 sc in a magic ring (5). - Rnd. 2: 5 BLO-sc (5).
- Rnd. 3: 3 sc, 1 dec (4).
Fasten off, leaving a long tail for sewing. The stem doesn’t need to be stuffed. Using a tapestry needle, weave the yarn tail through the front loop of each remaining stitch and pull tight to close the opening. Don’t weave in the yarn end, as it will be used later for sewing.
Sew the stem to the top of the pinecone and add a gold cord
Using sewing pins, position the stem at the top center of the pinecone. With a tapestry needle, sew it firmly in place. If you wish, make a hanging loop for the ornament using a gold cord.
HEDGEHOG
Palette option 1: Porcelain #7564 (body, ears, snout, arms, and legs), Brownie #7400 (spikes), Dulce de leche #7077 (bow tie and Santa hat), White #8001 (Santa hat).
Palette option 2: Porcelain #7564 (body, ears, snout, arms, and legs), Eco #5083 (spikes), Dulce de leche #7077 (bow tie), Brownie #7400 (Santa hat), White #8001 (Santa hat).
EARS (MAKE 2)
In color Porcelain (Amigurumi #7564).
Rnd. 1: make 1 sc, 1 hdc, 3 dc, 1 hdc, 1 sc in a magic ring (7).
Tighten the magic ring as usual and fasten off, leaving a yarn tail for finishing and sewing. Fold the ear in half and, using a tapestry needle, make a small stitch to join the two layers. Don’t weave in the yarn end, as it will be used later for sewing.
SNOUT
In color Porcelain (Amigurumi #7564).
Rnd. 1: work 6 sc in a magic ring (6).
Rnd. 2: [1 sc, 1 inc] x 3 (9).
Fasten off, leaving a long tail for sewing.
ARMS (MAKE 2)
In color Porcelain (Amigurumi #7564).
Rnd. 1: work 6 sc in a magic ring (6).
Rnd. 2–3 (2 ROUNDS): 6 sc (6).
- Flatten the arm opening so that the stitches line up. The arms don’t need to be stuffed.
Rnd. 4: working through both layers to close the opening, make 2 sc, 1 slst (3).
Fasten off, leaving a yarn tail for sewing.
LEGS (MAKE 2)
In color Porcelain (Amigurumi #7564).
- Rnd. 1: work 6 sc in a magic ring (6).
- Rnd. 2: [1 sc, 1 inc] x 3 (9).
- Rnd. 3–4 (2 ROUNDS): 9 sc (9).
- Rnd. 5: [1 sc, 1 dec] x 3 (6).
Fasten off, leaving a long tail for sewing. The legs don’t need to be stuffed.
Flatten the leg and, using a tapestry needle, weave the yarn tail through the front loop of each remaining stitch and pull tight to close the opening. Then, weave the remaining yarn through the leg, bringing it out at the side of the piece, where it will later be used for sewing.
BODY
In color Porcelain (Amigurumi #7564).
- Rnd. 1: work 6 sc in a magic ring (6).
- Rnd. 2: 6 inc (12).
- Rnd. 3: [1 sc, 1 inc] x 6 (18).
- Rnd. 4: [1 sc, 1 inc, 1 sc] x 6 (24).
- Rnd. 5: [3 sc, 1 inc] x 6 (30).
- Rnd. 6: [2 sc, 1 inc, 2 sc] x 6 (36).
- Rnd. 7–17 (11 ROUNDS): 36 sc (36).
- Rnd. 18: [2 sc, 1 dec, 2 sc] x 6 (30).
- Rnd. 19: [3 sc, 1 dec] x 6 (24).
- Rnd. 20: [1 sc, 1 dec, 1 sc] x 6 (18).
- Rnd. 21: [1 sc, 1 dec] x 6 (12).
Stuff the body firmly with fiberfill.
- Rnd. 22: 6 dec (6).
Add more stuffing if needed. Fasten off, leaving a yarn tail. Using a tapestry needle, weave the yarn tail through the front loop of each remaining stitch and pull tight to close the opening. Weave in the yarn end.
Sew the arms to the sides of the body
Using sewing pins, position the arms on both sides of the body, between Rnd. 12 and 14, leaving 20 st of distance between them, counted from the back of the body. With a tapestry needle, sew them firmly in place.
Sew the ears to the sides of the head
Using sewing pins, position the ears on the sides of the head, between Rnd. 7 and 8, leaving 20 visible stitches between them at the back of the body. With a tapestry needle, sew them firmly in place.
Note: When positioning the ears, align them with the arms so that they form an imaginary straight line along the sides of the body.
Sew the legs to the body
Using sewing pins, position the legs in a horizontal position on both sides of the body, between Rnd. 17 and 19. With a tapestry needle, sew them firmly in place.
Note: When positioning the legs, align them with the ears and arms so that they form an imaginary straight line along the sides of the body.
Sew the snout to the body
Using sewing pins, center the snout between the ears, over Rnd. 9 and 11. The snout doesn’t need to be stuffed. With a tapestry needle, sew them firmly in place.
Make the face details
- Nose: using a crewel needle and 1 strand of brown embroidery thread (Maxi Mouliné #880), embroider the nose at the center of the snout.
- Eyes and eyelashes: using a crewel needle and 2 strands of brown embroidery thread (Maxi Mouliné #880), embroider the eyes and eyelashes over Rnd. 8 and 9. Each eye should be approx. 2 st wide and placed 1 st away from the snout.
- Eyebrows: using a crewel needle and 2 strands of brown embroidery thread (Maxi Mouliné #880), embroider the eyebrows over Rnd. 7. Each eyebrow should be approx. 1 st in width and 1 round in height, keeping about 7 st of distance between them.
- If you wish, apply blush to the cheeks and inside the ears.
BOW TIE
In color Dulce de leche (Amigurumi #7077) or Brownie (Amigurumi #7400).
Rnd. 1: in a magic ring, work ch 2, 1 dc, ch 2, 1 slst, ch 2, 1 dc, ch 2, 1 slst (12 – ch are included in the stitch count).
Fasten off, leaving a long tail for finishing. Tighten the magic ring as usual. Wrap one of the yarn tails three times around the center of your work to create the bow shape. Then, tie a knot at the back of the piece.
Sew the bow tie to the center of the body
Using sewing pins, position the bow tie at the center of the body, just below the snout, between Rnd. 12 and 13. With a tapestry needle, sew it firmly in place.
SPIKES
Note: Make sure the body is fully assembled, with all parts sewn in place, before starting the spikes. You’ll need to test the base on the assembled body and check if the number of repeated rounds needs to be adjusted for your piece.
PART 1 - SPIKES BASE
In color Brownie (Amigurumi #7400) or Eco (Amigurumi #5083).
Ch 6. Stitches are worked around both sides of the foundation chain.
- Rnd. 1: starting into the second ch from the hook, make 4 sc, 3 sc in the last st. Continue on the other side of the foundation chain, and work 3 sc, 1 inc (12).
From this point on, all rounds will be worked entirely in BLO.
- Rnd. 2: in BLO, work 1 inc, 3 sc, 3 inc, 3 sc, 2 inc (18).
- Rnd. 3: in BLO, work 1 sc, 1 inc, 3 sc, [1 sc, 1 inc] x 3, 3 sc, [1 sc, 1 inc] x 2 (24).
- Rnd. 4: in BLO, work 1 sc, 1 inc, 4 sc, [1 sc, 1 inc, 1 sc] x 3, 3 sc, [1 sc, 1 inc, 1 sc] x 2 (30).
- Rnd. 5: in BLO, work 3 sc, 1 inc, 3 sc, [3 sc, 1 inc] x 3, 3 sc, [3 sc, 1 inc] x 2 (36).
- Rnd. 6: in BLO, work 2 sc, 1 inc, 5 sc, [2 sc, 1 inc, 2 sc] x 3, 3 sc, [2 sc, 1 inc, 2 sc] x 2 (42).
- Rnd. 7: in BLO, work 5 sc, 1 inc, 3 sc, [5 sc, 1 inc] x 3, 3 sc, [5 sc, 1 inc] x 2 (48).
- Rnd. 8–13 (6 ROUNDS): in BLO, work 48 sc (48).
Note: As you work the last three repeated rounds (Rnds. 11–13), test the fit of the base on the assembled body. Your stitch tension and the type of single crochet you use may affect the height, so you might need to work more or fewer rounds. The spikes base should sit a little forward from the middle of the body, resting gently over the arm seams and aligning with the ears and legs.
Keep in mind that when working the spikes (Part 2), the piece tends to shrink slightly, since we will be working into the front free loops. For this reason, the best fit is with the base positioned slightly over the arm seams. On my pieces, I worked 6 repeated rounds. Adjust the number of rounds as needed to fit your piece.
Invisible fasten off and weave in the yarn end.
PART 2 - SPIKES
In color Brownie (Amigurumi #7400) or Eco (Amigurumi #5083).
To create the spike effect, we’ll work into all remaining front loops of the base.
Start by pulling up a loop of yarn into the first remaining front loop of Rnd. 1 and make ch 5. Make 1 slst into the second remaining loop. From there, repeat the sequence [ch 5, 1 slst] through all remaining loops and then through all front loops of Rnd. 13.
When you reach the end, make an invisible fasten off and weave in the yarn end. Place the piece on the back of the body and, if you wish, secure it in place with silicone/fabric glue.
SANTA HAT
PART 1 – HAT BODY
In color Dulce de leche (Amigurumi #7077) or Brownie (Amigurumi #7400).
- Rnd. 1: work 5 sc in a magic ring (5).
- Rnd. 2: 5 sc (5).
- Rnd. 3: 5 inc (10).
- Rnd. 4–5 (2 ROUNDS): 10 sc (10).
- Rnd. 6: [1 sc, 1 inc] x 5 (15).
- Rnd. 7–9 (3 ROUNDS): 15 sc (15).
- Change to color White (Amigurumi Pelúcia #8001).
- Rnd. 10: [2 hdc, 2 hdc into next st] x 5 (20).
Invisible fasten off and weave in the yarn end.
PART 2 - POMPOM
In color White (Amigurumi Pelúcia #8001).
Rnd. 1: work ch 2 and 5 dc in a magic ring (5).
Rnd. 2: make only 1 slst (1). Leave the remaining stitches unworked.
Fasten off, leaving a yarn tail. To shape the pompom, using a tapestry needle, weave the yarn tail through the front loop of each remaining stitch and pull tight to close the opening. Weave in the yarn end. Finally, gently shape the piece to define the round form.
Attach the pompom and finish the hat
Place the pompom at the tip of the hat and secure it in place with silicone/fabric glue.
Fold the top of the hat down to one side. Using a tapestry needle and a length of yarn in the same color as the hat body, make a small stitch to secure the underside of the folded section to the hat, keeping the fold in place.
Fold the tip of the hat in half. Lightly stuff the hat with fiberfill.
Sew the hat to the top of the piece and add a gold cord
Pin the hat on the top of the piece and sew it firmly in place. If you wish, make a hanging loop for the ornament using a gold cord.
Designer: Jenifer - LovLoops