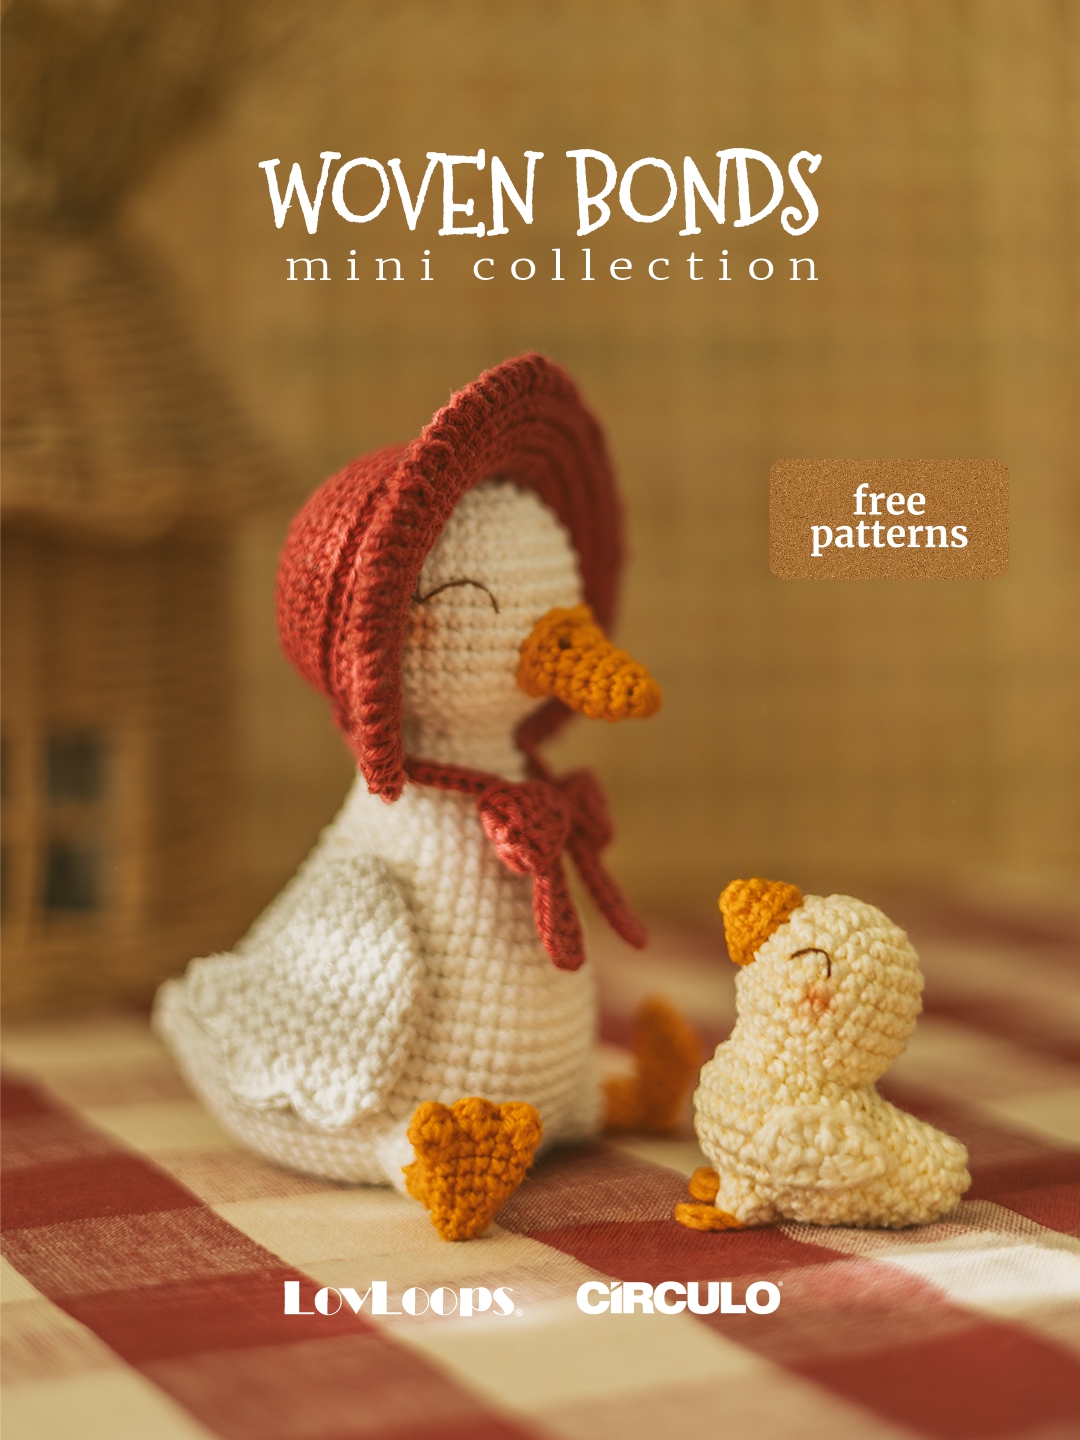
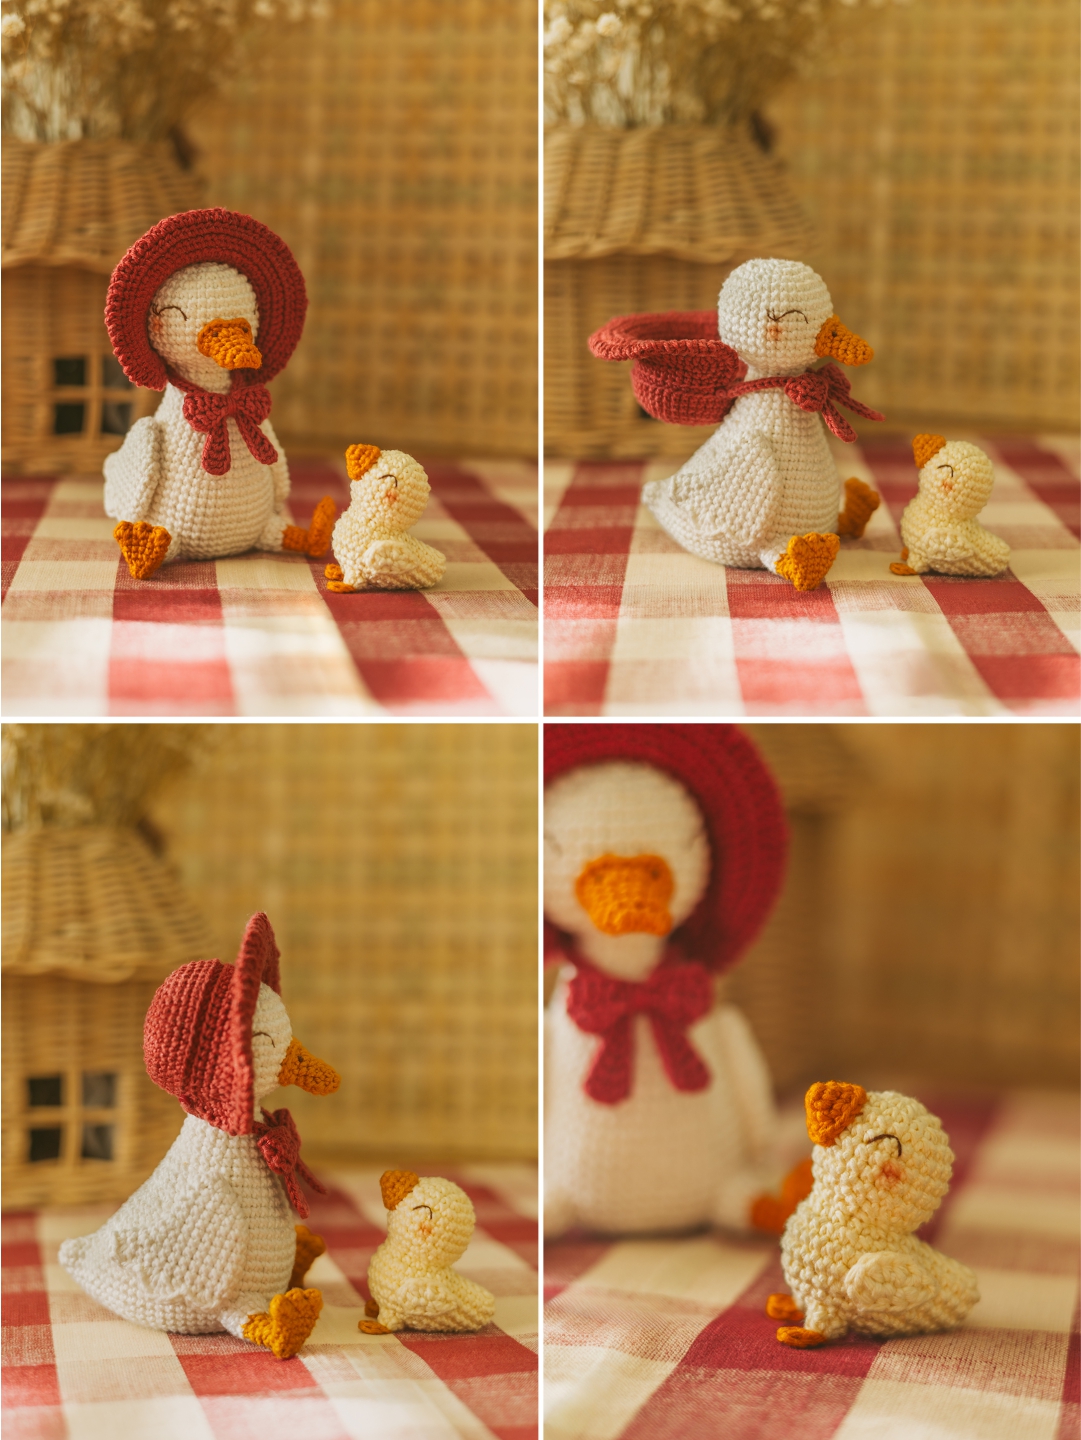
Woven Bonds Mini Collection
MATERIAIS
- Círculo Amigurumi yarn in colors:
- Cream #1112;
- Off-white #8176.
- Círculo Amigurumi Slim yarn in colors:
- Dark Cheddar #4131;
- Pink Pepper #7078.
- Embroidery thread Maxi Mouliné color Brown #882 (for details).
- 1.8 and 2.0 mm Crochet hooks.
- Embroidery needles (Tapestry no. 22, Crewel no. 9, and Milliner no. 5).
- Fiberfill.
- Stitch markers.
- Sewing pins.
- Scissors.
- Pliers.
- Fabric glue.
- Fabric stiffener (optional).
- Blush (for cheeks - optional).
EXECUÇÃO
ABBREVIATIONS (US Terms)
- BLO: back loops only.
- Ch: chain stitch.
- Dc: double crochet.
- Dec: single crochet decrease (two sc closed together).
- Hdc: half double crochet.
- Hdc-inc: half double crochet increase (two hdc into the same stitch).
- Inc: single crochet increase (two sc into the same stitch).
- Mini picot: picot stitch crocheted with two ch (two ch and then make a slst into the back bump of the second ch from the hook).
- Rnd: round(s).
- Sc: single crochet.
- Slst: slip stitch crochet.
- St: stitch(es).
- Tr: treble crochet.
- [...] x n: repeat the instructions, within brackets, n times.
- *…*: make all stitches, within asterisks, into the same base stitch.
- (...): total number of stitches in a round/row.
SIZES
- Using Círculo Amigurumi yarn, 2.0 mm crochet hook, and X single crochet, your pieces will measure approximately:
- Mama Duck: 4.92 in (12.5 cm).
- Baby Duck: 1.97 in (5 cm).
SKILL LEVEL
- Intermediate-advanced.
Crocheting Instructions
GENERAL NOTE:
This pattern uses two types of yarn (Amigurumi
and Amigurumi Slim) and two hook sizes
throughout the project. Pay close attention to the yarn and hook recommendations specified in each section of the pattern to achieve the best results.
During the development of this project, 1.8 mm and 2.0 mm hooks were used; however, you may choose other combinations, such as 2.0 mm and 2.2 mm, depending on your tension and personal preference.
If you choose to work the project using only one type of yarn or a single hook size, please note that the finish and overall result may differ from what is shown in the photos, as some parts may become disproportionate.
MAMA DUCK
HEAD AND BODY
In color Off-white (Amigurumi #8176) and a 2.0 mm crochet hook.
We will start with the head.
Rnd. 1: work 7 sc in a magic ring (7).
Rnd. 2: 7 inc (14).
Rnd. 3: [1 sc, 1 inc] x 7 (21).
Rnd. 4: [1 sc, 1 inc, 1 sc] x 7 (28).
Rnd. 5: [3 sc, 1 inc] x 7 (35).
Rnd. 6–12 (7 ROUNDS): 35 sc (35).
Rnd. 13: [3 sc, 1 dec] x 7 (28).
Rnd. 14: [1 sc, 1 dec, 1 sc] x 7 (21).
Rnd. 15: [1 sc, 1 dec] x 7 (14).
Rnd. 16: 14 sc (14).
Stuff the head with fiberfill. Continue stuffing as you go.
From this point on, we'll start the body.
Rnd. 17: [1 sc, 1 inc] x 7 (21).
Rnd. 18–20 (3 ROUNDS): 21 sc (21).
Rnd. 21: [1 sc, 1 inc, 1 sc] x 7 (28).
Rnd. 22: 28 sc (28).
Rnd. 23: 4 sc, [1 inc, 1 sc] x 3, 18 sc (31).
Rnd. 24: 20 sc, 1 inc, 5 sc, 1 inc, 4 sc (33).
Rnd. 25: 4 sc, [1 inc, 2 sc] x 3, 11 sc, 1 inc, 8 sc (37).
Rnd. 26: 37 sc (37).
Rnd. 27: 5 sc, [1 inc, 3 sc] x 3, 7 sc, 1 inc, 6 sc, 1 inc, 5 sc (42).
Rnd. 28: 28 sc, [1 inc, 2 sc] x 3, 5 sc (45).
Rnd. 29: 6 sc, [1 inc, 4 sc] x 3, 24 sc (48).
Rnd. 30: 48 sc (48).
Rnd. 31: 7 sc, [1 inc, 5 sc] x 3, 23 sc (51).
Rnd. 32: 11 sc, 1 inc, 6 sc, 1 inc, 32 sc (53).
Rnd. 33: 53 sc (53).
Rnd. 34: 8 sc, 1 inc, 7 sc, ch 3. Working back into the foundation chains, starting into the second ch from the hook, make 2 sc, then 1 sc in the same st where the chains were started. Continue around the body with 6 sc, 1 inc, 30 sc (58 – ch don’t count toward the stitch total).
Rnd. 35: 17 sc, on the other side of the foundation chains work 1 sc, 1 inc. Continue around with 1 inc, 40 sc (62).
Note: The foundation chains mentioned in Rnd. 35 refer to the chains worked in Rnd. 34, which are now being worked along the opposite side. No new chains are made in this round.
Rnd. 36: 62 sc (62).
Rnd. 37: 18 sc, 2 dec, 18 sc, [1 dec, 8 sc] x 2, 1 dec (57).
Rnd. 38: [8 sc, 1 dec] x 3, 27 sc (54).
Rnd. 39: 11 sc, [1 dec, 3 sc] x 3, 9 sc, [1 dec, 6 sc] x 2, 1 dec, 1 sc (48).
Rnd. 40: 14 sc, 2 dec, 12 sc, [2 sc, 1 dec, 3 sc, 1 dec] x 2 (42).
Rnd. 41: 1 dec, 11 sc, 2 dec, 11 sc, 1 dec, 2 sc, 1 dec, 4 sc, 1 dec, 2 sc (36).
Rnd. 42: 1 sc, 1 dec, 8 sc, 2 dec, 8 sc, [1 dec, 2 sc] x 2, 2 sc, 1 dec, 1 sc (30).
Rnd. 43: 1 dec, 5 sc, 4 dec, 5 sc, 2 dec, [1 sc, 1 dec] x 2 (21).
Rnd. 44: [1 dec, 1 sc] x 2, 2 dec, [1 dec, 1 sc] x 3, 1 dec (13).
Rnd. 45: 1 dec, [1 sc, 2 dec] x 2, 1 sc (8).
Add more stuffing if needed. Fasten off, leaving a yarn tail. Using a tapestry needle, weave the yarn tail through the front loop of each remaining stitch and pull tight to close. Weave in the yarn end.
LEFT WING
In color Off-white (Amigurumi #8176) and a 2.0 mm crochet hook.
Rnd. 1: work 7 sc in a magic ring (7).
Rnd. 2: 2 sc, 3 inc, 2 sc (10).
Rnd. 3: 4 sc, 2 inc, 4 sc (12).
Rnd. 4: 5 sc, 2 inc, 5 sc (14).
Rnd. 5: 6 sc, 2 inc, 6 sc (16).
Rnd. 6: 15 sc, 1 inc (17).
Rnd. 7: 1 inc, 16 sc (18).
Rnd. 8: 17 sc, 1 inc (19).
Rnd. 9: 1 inc, 17 sc, 1 inc (21).
Rnd. 10: 1 inc, 8 sc, 2 hdc, 9 sc, 1 inc (23).
Rnd. 11: 1 inc, 9 sc, 1 dec, 11 sc (23).
Flatten the wing opening so that the stitches line up. The wing doesn’t need to be stuffed.
Rnd. 12: working through both layers to close the opening, make 1 sc, 3 hdc into the next st, 1 sc, 1 slst, 1 sc, 5 dc into the next st, 1 hdc, 1 slst, 1 sc, 3 hdc into the next st, 1 slst (19).
Fasten off, leaving a long yarn tail for sewing.
RIGHT WING
In color Off-white (Amigurumi #8176) and a 2.0 mm crochet hook.
Rnd. 1: work 7 sc in a magic ring (7).
Rnd. 2: 2 inc, 4 sc, 1 inc (10).
Rnd. 3: 2 inc, 8 sc (12).
Rnd. 4: 1 sc, 2 inc, 9 sc (14).
Rnd. 5: 2 sc, 2 inc, 10 sc (16).
Rnd. 6: 11 sc, 2 inc, 3 sc (18).
Rnd. 7: 18 sc (18).
Rnd. 8: 12 sc, 2 inc, 4 sc (20).
Rnd. 9: 13 sc, 2 inc, 5 sc (22).
Rnd. 10: 3 sc, 2 hdc, 9 sc, 2 inc, 6 sc (24).
Rnd. 11: 3 sc, 1 dec, 19 sc (23).
Rnd. 12: work only 4 sc (4). Leave the remaining 19 st unworked.
Flatten the wing opening so that the stitches line up. The wing doesn’t need to be stuffed.
Rnd. 13: working through both layers to close the opening, make 1 slst, 3 hdc into the next st, 1 sc, 1 slst, 1 hdc, 5 dc into the next st, 1 sc, 1 slst, 1 sc, 3 hdc into the next st, 1 sc (19).
Fasten off, leaving a long yarn tail for sewing.
BILL
In color Dark Cheddar (Amigurumi Slim #4131) and a 1.8 mm crochet hook.
Ch 4. Stitches are worked around both sides of the foundation chain.
Rnd. 1: starting into the second ch from the hook, make 1 inc, 1 sc, 3 sc in the last st. Continue on the other side of the foundation chain and work 2 sc (8).
Rnd. 2: 2 inc, 1 sc, 3 inc, 1 sc, 1 inc (14).
Rnd. 3–4 (2 ROUNDS): 14 sc (14).
Rnd. 5: 1 dec, 1 sc, 1 inc, 1 hdc-inc, 1 sc, 1 hdc-inc, 1 inc, 1 sc, 1 dec, 3 sc (16).
Rnd. 6: 1 hdc, 1 hdc-inc, 1 hdc, 1 sc, 1 inc, 3 slst, 1 inc, 1 sc, 1 hdc, 1 hdc-inc, 1 sc, 1 dec, 1 slst (19).
Invisible fasten off, leaving a long yarn tail for sewing. The bill doesn’t need to be stuffed.
LEGS (MAKE 2)
The legs will be worked in three parts.
PART 1 – SHANK
In color Dark Cheddar (Amigurumi Slim #4131) and a 1.8 mm crochet hook.
Rnd. 1: work 6 sc in a magic ring (6).
Rnd. 2: 6 BLO-sc (6).
Rnd. 3–4 (2 ROUNDS): 6 sc (6).
Rnd. 5: 6 BLO-sc (6).
Fasten off and weave in the yarn end. Stuff the leg with fiberfill.
PART 2 - THIGH
In color Off-white (Amigurumi #8176) and a 2.0 mm crochet hook.
Rnd. 1: pull up a loop into the first remaining front loop of Rnd. 5 of the shank (Part 1) and work [1 sc, 1 inc] x 3 (9).
Note: The remaining front loops correspond to the loops that were left unworked during Rnd. 5.
Rnd. 2: 1 sc, 1 hdc-inc, 1 hdc, 1 sc, 2 inc, 1 sc, 1 hdc, 1 hdc-inc (13).
Rnd. 3: work only 2 sc (2). Leave the remaining 11 st unworked.
Invisible fasten off, leaving a yarn tail for sewing.
PART 3 – WEBBED FOOT
In color Dark Cheddar (Amigurumi Slim #4131) and a 1.8 mm crochet hook.
Rnd. 1: work 6 sc in a magic ring (6).
Rnd. 2: 6 sc (6).
Rnd. 3: [1 sc, 1 inc] x 3 (9).
Rnd. 4: [1 sc, 1 inc, 1 sc] x 3 (12).
Rnd. 5–6 (2 ROUNDS): 12 sc (12).
Rnd. 7: work only 2 sc (2). Leave the remaining 10 st unworked.
Flatten the webbed foot opening so that the stitches line up. The foot doesn’t need to be stuffed.
Rnd. 8: working through both layers to close the opening, make [*1 sc, 1 hdc, 1 sc*, 1 slst into the next st] x 3 (9).
Fasten off, leaving a yarn tail for sewing. Using a tapestry needle, thread the remaining yarn through the webbed foot, bringing it out between Rnd. 1 and 2, on the opposite side of the start of the rounds, where it will later be used for sewing.
Using sewing pins, center Rnd. 1 of the shank (Part 1) over Rnd. 1 to 3 of the webbed foot (Part 3). The right side of the foot ruffle should face toward the shank. With a tapestry needle and using the remaining front loops of Rnd. 2 of the shank, sew it firmly in place.
BONNET HAT
In color Pink Pepper (Amigurumi Slim #7078) and a 2.0 mm crochet hook. The bonnet hat will be worked in four parts.
Note: Although the bonnet hat is crocheted with Amigurumi Slim yarn, to make the piece softer, use the same hook size used for the body.
PART 1 – BASE
Rnd. 1: work 7 sc in a magic ring (7).
Rnd. 2: 7 inc (14).
Rnd. 3: [1 sc, 1 inc] x 7 (21).
Rnd. 4: [1 sc, 1 inc, 1 sc] x 7 (28).
Rnd. 5: [3 sc, 1 inc] x 7 (35).
Rnd. 6: 35 sc (35).
Rnd. 7: [2 sc, 1 inc, 2 sc] x 7 (42).
Rnd. 8–10 (3 ROUNDS): 42 sc (42).
Invisible fasten off and weave in the yarn end.
PART 2 – HAT BRIM
Ch 34. Stitches are worked around both sides of the foundation chain.
Rnd. 1: start in the second ch from the hook, 32 sc, 3 sc into the last st. Continue on the other side of the foundation chain, [2 hdc, 1 hdc-inc] x 10, 1 hdc, 1 inc (78).
Rnd. 2: 1 inc, 31 sc, 3 inc, 1 sc, [4 hdc, 1 hdc-inc] x 7, 4 hdc, 1 sc, 2 inc (91).
Rnd. 3: 1 sc, 1 inc, 31 sc, [1 sc, 1 inc] x 3, 2 sc, 45 hdc, 1 sc, [1 sc, 1 inc] x 2 (97).
Work 1 sc to shift the end of the last round. Don’t fasten off. Now, we'll join the brim to the base of the hat.
Position the brim (Part 2) around the base (Part 1), keeping the wrong side of the brim facing outward and the right side of the brim facing the right side of the base. Align the first st of Rnd. 10 of the base with the next free st of the brim. This will be the starting point for joining.
When the two parts are overlapped, you will see four visible loops (two from the base and two from the brim). Working only through the outer loops of each part and always inserting the hook from the inside of the base toward the outside of the brim, join the pieces by working 35 sc. Don’t fasten off.
Note: When inserting the hook, make sure you are picking up only the outer loops, and be careful not to skip stitches while joining. The remaining inner loops will not be worked and will be visible once the brim is turned out, creating the detail of the hat. The join will be located on the inside of the hat.
With the base joined to the brim, turn the brim right side out. We will now work the finishing round around the entire edge of the hat.
Rnd. 4: without turning the piece, return to the brim and 1 sc into the first free st after the join (this corresponds to the 37th st of Rnd. 3 of the brim). Place a stitch marker in this st (Marker A). Continue working [ch 2, 1 slst] x 60, then ch 2, 1 sc. Place a stitch marker in this last st (Marker B). Next, return to the base of the hat and work 7 slst to complete the round.
Note: If your st are very loose and you prefer a firmer edge on the brim, work only ch 1 instead of ch 2 in the repeat sequence, or use a one-size smaller crochet hook while working around the brim.
Invisible fasten off and weave in the yarn end.
PART 3 – BOW
Ch 22. Ensure the chain isn't twisted, then insert the hook into the first ch. Join the foundation chains with 1 slst to form a ring. Continue working in a spiral.
Rnd. 1–2 (2 ROUNDS): [1 sc, 2 hdc, 3 dc, 2 hdc, 1 sc, 2 slst] x 2 (22).
Invisible fasten off and weave in the yarn end.
PART 4 – BOW TIES AND LEGS
Leaving approx. 4.72 in (12 cm) of yarn tail at the beginning, ch 13.
Tie 1: starting in the second ch from the hook and, working only into the back bumps of the ch, make 12 slst, ch 11. Don’t fasten off.
Leg 1: return to the fourth ch from the hook and, working only into the back bumps of the ch, make 2 tr, 2 dc, 2 hdc, 2 sc, ch 11. Don’t fasten off.
Leg 2: return again to the fourth ch from the hook and, working only into the back bumps of the ch, make 2 tr, 2 dc, 2 hdc, 2 sc, ch 13. Don’t fasten off.
Tie 2: return to the second ch from the hook and, working only into the back bumps of the ch, make 12 slst. Fasten off, leaving approx. 4.72 in (12 cm) of yarn tail for finishing.
Note: At the end, you will have an X-shaped piece. The ties will be attached to the lower part of the bonnet, and the two legs will form the ends of the bow.
BONNET HAT ASSEMBLY
Position Part 4 inside the bow (Part 3), with the two upper ties facing upward and the two legs facing downward.
To shape the bow, use the remaining yarn tails to wrap two tight turns around the center of the bow (Part 3), passing between the upper ties and the lower legs to create the bow shape. The wraps should embrace all parts together. Then, tie a knot on the wrong side of the bow, fasten off, and weave in the yarn end. To ensure better fixation of the knot, apply a small drop of glue to the wrong side of the bow.
ASSEMBLING AND FINISHING TOUCHES
Embroider the bill details
Using a milliner needle and 4 strands of brown embroidery thread (Maxi Mouliné #882), embroider two French knots, with three wraps each, on the upper part of the beak (the area with two small waves), between Rnd. 5 and 6, leaving 5 st of distance between them.
Sew the bill to the head
Using sewing pins, center the bill on the opposite side of the start of the rounds, over Rnd. 9 and 12, covering 6 st in width. With a tapestry needle, sew it firmly in place. Gently shape the bill with your fingers so it curves slightly.
Embroider the eyes and eyelashes
Using a crewel needle and 1 strand of brown embroidery thread (Maxi Mouliné #882), embroider the eyes and eyelashes over Rnd. 8 and 9. Each eye should be approx. 4 st in width and just over 1 round in height, leaving 8 st of distance between them, and placed 1 st away from the bill.
Sew the wings to the sides of the body
Using sewing pins, position the wings on the sides of the body, slightly angled, between Rnd. 24 and 35, keeping the magic ring area facing upward and the ruffles facing downward. Keep a distance of 18 st, counted on Rnd. 32, between the wings across the belly area. The pointier parts of the wings, located in the ruffled section, should face toward the back. Using a tapestry needle, sew firmly only the top and the rounded edge of the wing that faces the belly. The back edge of the wing may be left unsewn.
Sew the legs to the body
Using sewing pins, position the legs on both sides of the front part of the body, between Rnd. 35 and 38, leaving a distance of 11 st between them, counted on the front of the body on Rnd. 36. The webbed feet should be pointing upward, with the soles facing forward. Using a tapestry needle, sew firmly in place. If necessary, add fiberfill to the leg before finishing the sewing.
Note: Before sewing, check that the piece sits properly with the body and the heels touching the surface. Adjust the position of the legs, if necessary, to ensure balance.
If you wish, apply blush to the cheeks.
Stiffen the bow legs
To keep the bow legs straight and firm, apply a small drop of fabric glue or fabric stiffener to the wrong side of the legs.
Attach the bow ties to the bonnet hat
This piece can easily be assembled inside out (with the wrong side of the bow facing outward once the hat is worn). To ensure correct positioning, it is recommended to place the bonnet on the Mama Duck’s head first and define the sewing points with the hat already positioned.
Using a tapestry needle and a piece of Pink Pepper yarn (Amigurumi Slim #7078), attach the bow ties as follows:
- The right tie (when the piece is viewed from the front) should be sewn immediately next to the last sc of Rnd. 4 of the brim, where Marker B was placed, right at the corner formed by the join between the brim and the base. Place the bonnet on the head and then proceed to sew the left tie.
- The left tie should be sewn on the opposite side of the bonnet, immediately next to the first sc worked along Rnd. 4 of the brim, where Marker A was placed, right at the corner formed by the join between the brim and the base.
Note: The bonnet hat is not intended to be removable, although it can be placed on and taken off the head.
THE MAMA DUCK IS READY!
BABY DUCK
HEAD AND BODY
In color Cream (Amigurumi #1112) and a 2.0 mm crochet hook.
We will start with the head.
Rnd. 1: work 6 sc in a magic ring (6).
Rnd. 2: 6 inc (12).
Rnd. 3: [1 sc, 1 inc] x 6 (18).
Rnd. 4: [1 sc, 1 inc, 1 sc] x 6 (24).
Rnd. 5–8 (4 ROUNDS): 24 sc (24).
Rnd. 9: [1 sc, 1 dec, 1 sc] x 6 (18).
Rnd. 10: [1 sc, 1 dec] x 6 (12).
Stuff the head with fiberfill. Continue stuffing as you go.
From this point on, we'll start the body.
Rnd. 11: ch 6. Working back into the foundation chains, starting into the second ch from the hook, make 5 sc. Continue around the body with [1 sc, 1 inc] x 6. On the other side of the foundation chains work 4 sc, 1 inc into the last st (29 - ch don’t count toward the stitch total).
Rnd. 12: 1 inc, 4 sc, [1 inc, 2 sc] x 6, 4 sc, 2 inc (38).
Rnd. 13: 38 sc (38).
Rnd. 14: 1 dec, 34 sc, 1 dec (36).
Rnd. 15: 6 sc, [1 dec, 2 sc] x 6, 4 sc, 1 dec (29).
Rnd. 16: 1 dec, 25 sc, 1 dec (27).
Rnd. 17: [1 dec, 1 sc] x 4, 1 sc, [1 dec, 1 sc] x 4, 1 dec (18).
Rnd. 18: [1 dec, 1 sc] x 3, [1 sc, 1 dec] x 3 (12).
Rnd. 19: 6 dec (6).
Note: If, while working Rnd. 19, you notice that the base is becoming pointy, work only 5 dec in this round and then fasten off.
Add more stuffing if needed. Fasten off, leaving a yarn tail. Using a tapestry needle, weave the yarn tail through the front loop of each remaining stitch and pull tight to close. Weave in the yarn end.
WINGS (MAKE 2)
In color Cream (Amigurumi #1112) and a 2.0 mm crochet hook.
Ch 4. Stitches are worked around both sides of the foundation chain.
Rnd. 1: start in the third ch from the hook with *1 dc, 1 hdc*, into the last st work *1 hdc, 1 dc,1 mini picot, 1 dc, 1 hdc*. Continue on the other side of the foundation chain, *1 hdc, 1 dc* (8 – mini picot doesn’t count toward the stitch total).
Fasten off, leaving a long tail for sewing. Using a tapestry needle, make a false st by passing the needle through the first st of the Rnd. 1 and then inserting it back into the center of the same st where you came from. Don’t weave in the yarn end, as it will be used later for sewing.
BILL
In color Dark Cheddar (Amigurumi Slim #4131) and a 1.8 mm crochet hook.
Rnd. 1: work 5 sc in a magic ring (5).
Rnd. 2: 5 inc (10).
Rnd. 3: [1 sc, 1 inc] x 5 (15).
Invisible fasten off, leaving a long yarn tail for sewing. Using your fingers, gently shape the bill into a cone shape.
LEGS (MAKE 2)
The legs will be worked in two parts.
PART 1 – THIGH
In color Cream (Amigurumi #1112) and a 2.0 mm crochet hook.
Rnd. 1: work 5 sc in a magic ring (5).
Fasten off, leaving a yarn tail for sewing. Tighten the magic ring as usual.
To create the button-like effect on the thigh, fold the piece in half, keeping the wrong side facing inward. Using a tapestry needle, work a false stitch by passing the needle through the first st worked and then inserting it back into the center of the same st where you came from. Gently tighten the loop. Don’t weave in the yarn end, as it will be used later for sewing.
PART 2 - WEBBED FOOT
In color Dark Cheddar (Amigurumi Slim #4131) and a 1.8 mm crochet hook.
Ch 4.
Rnd. 1: starting in the second ch from the hook and, working only into the back bumps of the ch, make 1 dc, 1 hdc, 1 sc (3).
Fasten off, leaving a yarn tail for sewing. Using a tapestry needle, thread the remaining yarn ends through the magic ring of the thigh (Part 1) and secure them firmly in place.
ASSEMBLING AND FINISHING TOUCHES
Sew the bill to the head
Using sewing pins, center the bill on the head, on the opposite side of the start of the rounds, over Rnd. 4 and 7. With a tapestry needle, sew it firmly in place. If necessary, stuff the bill with fiberfill before closing the seam.
Embroider the eyes
Using a crewel needle and 1 strand of brown embroidery thread (Maxi Mouliné #882), embroider the eyes over Rnd. 5. Each eye should be approx. 2 st in width, leaving 2 st of distance from the bill.
Sew the wings to the sides of the body
Using sewing pins, position the wings on the sides of the body, slightly angled, between Rnd. 13 and 16, with the rounded edge facing forward and the pointed edge facing backward. Keep a distance of 12 st between the wings, counted on Rnd. 14, across the belly area. Using a tapestry needle, sew firmly only the rounded edge of the wing.
Sew the legs to the body
Using sewing pins, position the legs on both sides of the lower part of the body, between Rnd. 17 and 18, leaving approx. 2 visible st between them, counted on Rnd. 18. The webbed feet should face forward. Using a tapestry needle, sew firmly in place.
Note: Before sewing, check that the piece stands upright, with the back of the body and the feet touching the surface. Adjust the position of the legs, if necessary, to ensure balance.
Stiffen the webbed feet
To keep the feet straight and firm, apply a small drop of fabric glue or fabric stiffener to the wrong side of the feet (soles).
If you wish, apply blush to the cheeks.
THE BABY DUCK IS READY!
Designer: Jenifer - Lovloops